who need this tutorial? for those who are dizzy, confused, or desperate about how to install and run the latest version of SatNOGS ground station on a Raspberry Pi
minimum setup
- rtl-sdr
- raspberry pi 3/4.
- internet over lan cable
I recommend Raspberry Pi OS Lite (bookworm version), because trixie not supported yet by satnogs
extract and flash to memory card (cautious: change /dev/sdx with your sd card location. you can use sudo fdisk -l command for make sure)
sudo dd if=2025-05-13-raspios-bookworm-arm64-lite.img of=/dev/sdx bs=1M conv=fsync status=progress
or or for hassle free you can use raspberry pi imager
SDR setup
login to raspberry console
sudo nano /etc/modprobe.d/blacklist-sdr.conf
copy paste this
blacklist rtl2832_sdr
blacklist dvb_usb_rtl28xxu
blacklist rtl2832
blacklist airspy
blacklist hackrf
blacklist msi001
blacklist msi2500
save with ctrl+x
sudo nano /etc/udev/rules.d/rtl-sdr.rules
copy paste this
#
# Copyright 2012-2013 Osmocom rtl-sdr project
#
# This program is free software: you can redistribute it and/or modify
# it under the terms of the GNU General Public License as published by
# the Free Software Foundation, either version 3 of the License, or
# (at your option) any later version.
#
# This program is distributed in the hope that it will be useful,
# but WITHOUT ANY WARRANTY; without even the implied warranty of
# MERCHANTABILITY or FITNESS FOR A PARTICULAR PURPOSE.  See the
# GNU General Public License for more details.
#
# You should have received a copy of the GNU General Public License
# along with this program.  If not, see <http://www.gnu.org/licenses/>.
#

# original RTL2832U vid/pid (hama nano, for example)
SUBSYSTEMS=="usb", ATTRS{idVendor}=="0bda", ATTRS{idProduct}=="2832", ENV{ID_SOFTWARE_RADIO}="1", MODE="0660", GROUP="plugdev"

# RTL2832U OEM vid/pid, e.g. ezcap EzTV668 (E4000), Newsky TV28T (E4000/R820T) etc.
SUBSYSTEMS=="usb", ATTRS{idVendor}=="0bda", ATTRS{idProduct}=="2838", ENV{ID_SOFTWARE_RADIO}="1", MODE="0660", GROUP="plugdev"

# DigitalNow Quad DVB-T PCI-E card (4x FC0012?)
SUBSYSTEMS=="usb", ATTRS{idVendor}=="0413", ATTRS{idProduct}=="6680", ENV{ID_SOFTWARE_RADIO}="1", MODE="0660", GROUP="plugdev"

# Leadtek WinFast DTV Dongle mini D (FC0012)
SUBSYSTEMS=="usb", ATTRS{idVendor}=="0413", ATTRS{idProduct}=="6f0f", ENV{ID_SOFTWARE_RADIO}="1", MODE="0660", GROUP="plugdev"

# Genius TVGo DVB-T03 USB dongle (Ver. B)
SUBSYSTEMS=="usb", ATTRS{idVendor}=="0458", ATTRS{idProduct}=="707f", ENV{ID_SOFTWARE_RADIO}="1", MODE="0660", GROUP="plugdev"

# Terratec Cinergy T Stick Black (rev 1) (FC0012)
SUBSYSTEMS=="usb", ATTRS{idVendor}=="0ccd", ATTRS{idProduct}=="00a9", ENV{ID_SOFTWARE_RADIO}="1", MODE="0660", GROUP="plugdev"

# Terratec NOXON rev 1 (FC0013)
SUBSYSTEMS=="usb", ATTRS{idVendor}=="0ccd", ATTRS{idProduct}=="00b3", ENV{ID_SOFTWARE_RADIO}="1", MODE="0660", GROUP="plugdev"

# Terratec Deutschlandradio DAB Stick (FC0013)
SUBSYSTEMS=="usb", ATTRS{idVendor}=="0ccd", ATTRS{idProduct}=="00b4", ENV{ID_SOFTWARE_RADIO}="1", MODE="0660", GROUP="plugdev"

# Terratec NOXON DAB Stick - Radio Energy (FC0013)
SUBSYSTEMS=="usb", ATTRS{idVendor}=="0ccd", ATTRS{idProduct}=="00b5", ENV{ID_SOFTWARE_RADIO}="1", MODE="0660", GROUP="plugdev"

# Terratec Media Broadcast DAB Stick (FC0013)
SUBSYSTEMS=="usb", ATTRS{idVendor}=="0ccd", ATTRS{idProduct}=="00b7", ENV{ID_SOFTWARE_RADIO}="1", MODE="0660", GROUP="plugdev"

# Terratec BR DAB Stick (FC0013)
SUBSYSTEMS=="usb", ATTRS{idVendor}=="0ccd", ATTRS{idProduct}=="00b8", ENV{ID_SOFTWARE_RADIO}="1", MODE="0660", GROUP="plugdev"

# Terratec WDR DAB Stick (FC0013)
SUBSYSTEMS=="usb", ATTRS{idVendor}=="0ccd", ATTRS{idProduct}=="00b9", ENV{ID_SOFTWARE_RADIO}="1", MODE="0660", GROUP="plugdev"

# Terratec MuellerVerlag DAB Stick (FC0013)
SUBSYSTEMS=="usb", ATTRS{idVendor}=="0ccd", ATTRS{idProduct}=="00c0", ENV{ID_SOFTWARE_RADIO}="1", MODE="0660", GROUP="plugdev"

# Terratec Fraunhofer DAB Stick (FC0013)
SUBSYSTEMS=="usb", ATTRS{idVendor}=="0ccd", ATTRS{idProduct}=="00c6", ENV{ID_SOFTWARE_RADIO}="1", MODE="0660", GROUP="plugdev"

# Terratec Cinergy T Stick RC (Rev.3) (E4000)
SUBSYSTEMS=="usb", ATTRS{idVendor}=="0ccd", ATTRS{idProduct}=="00d3", ENV{ID_SOFTWARE_RADIO}="1", MODE="0660", GROUP="plugdev"

# Terratec T Stick PLUS (E4000)
SUBSYSTEMS=="usb", ATTRS{idVendor}=="0ccd", ATTRS{idProduct}=="00d7", ENV{ID_SOFTWARE_RADIO}="1", MODE="0660", GROUP="plugdev"

# Terratec NOXON rev 2 (E4000)
SUBSYSTEMS=="usb", ATTRS{idVendor}=="0ccd", ATTRS{idProduct}=="00e0", ENV{ID_SOFTWARE_RADIO}="1", MODE="0660", GROUP="plugdev"

# PixelView PV-DT235U(RN) (FC0012)
SUBSYSTEMS=="usb", ATTRS{idVendor}=="1554", ATTRS{idProduct}=="5020", ENV{ID_SOFTWARE_RADIO}="1", MODE="0660", GROUP="plugdev"

# Astrometa DVB-T/DVB-T2 (R828D)
SUBSYSTEMS=="usb", ATTRS{idVendor}=="15f4", ATTRS{idProduct}=="0131", ENV{ID_SOFTWARE_RADIO}="1", MODE="0660", GROUP="plugdev"

# HanfTek DAB+FM+DVB-T
SUBSYSTEMS=="usb", ATTRS{idVendor}=="15f4", ATTRS{idProduct}=="0133", ENV{ID_SOFTWARE_RADIO}="1", MODE="0660", GROUP="plugdev"

# Compro Videomate U620F (E4000)
SUBSYSTEMS=="usb", ATTRS{idVendor}=="185b", ATTRS{idProduct}=="0620", ENV{ID_SOFTWARE_RADIO}="1", MODE="0660", GROUP="plugdev"

# Compro Videomate U650F (E4000)
SUBSYSTEMS=="usb", ATTRS{idVendor}=="185b", ATTRS{idProduct}=="0650", ENV{ID_SOFTWARE_RADIO}="1", MODE="0660", GROUP="plugdev"

# Compro Videomate U680F (E4000)
SUBSYSTEMS=="usb", ATTRS{idVendor}=="185b", ATTRS{idProduct}=="0680", ENV{ID_SOFTWARE_RADIO}="1", MODE="0660", GROUP="plugdev"

# GIGABYTE GT-U7300 (FC0012)
SUBSYSTEMS=="usb", ATTRS{idVendor}=="1b80", ATTRS{idProduct}=="d393", ENV{ID_SOFTWARE_RADIO}="1", MODE="0660", GROUP="plugdev"

# DIKOM USB-DVBT HD
SUBSYSTEMS=="usb", ATTRS{idVendor}=="1b80", ATTRS{idProduct}=="d394", ENV{ID_SOFTWARE_RADIO}="1", MODE="0660", GROUP="plugdev"

# Peak 102569AGPK (FC0012)
SUBSYSTEMS=="usb", ATTRS{idVendor}=="1b80", ATTRS{idProduct}=="d395", ENV{ID_SOFTWARE_RADIO}="1", MODE="0660", GROUP="plugdev"

# KWorld KW-UB450-T USB DVB-T Pico TV (TUA9001)
SUBSYSTEMS=="usb", ATTRS{idVendor}=="1b80", ATTRS{idProduct}=="d397", ENV{ID_SOFTWARE_RADIO}="1", MODE="0660", GROUP="plugdev"

# Zaapa ZT-MINDVBZP (FC0012)
SUBSYSTEMS=="usb", ATTRS{idVendor}=="1b80", ATTRS{idProduct}=="d398", ENV{ID_SOFTWARE_RADIO}="1", MODE="0660", GROUP="plugdev"

# SVEON STV20 DVB-T USB & FM (FC0012)
SUBSYSTEMS=="usb", ATTRS{idVendor}=="1b80", ATTRS{idProduct}=="d39d", ENV{ID_SOFTWARE_RADIO}="1", MODE="0660", GROUP="plugdev"

# Twintech UT-40 (FC0013)
SUBSYSTEMS=="usb", ATTRS{idVendor}=="1b80", ATTRS{idProduct}=="d3a4", ENV{ID_SOFTWARE_RADIO}="1", MODE="0660", GROUP="plugdev"

# ASUS U3100MINI_PLUS_V2 (FC0013)
SUBSYSTEMS=="usb", ATTRS{idVendor}=="1b80", ATTRS{idProduct}=="d3a8", ENV{ID_SOFTWARE_RADIO}="1", MODE="0660", GROUP="plugdev"

# SVEON STV27 DVB-T USB & FM (FC0013)
SUBSYSTEMS=="usb", ATTRS{idVendor}=="1b80", ATTRS{idProduct}=="d3af", ENV{ID_SOFTWARE_RADIO}="1", MODE="0660", GROUP="plugdev"

# SVEON STV21 DVB-T USB & FM
SUBSYSTEMS=="usb", ATTRS{idVendor}=="1b80", ATTRS{idProduct}=="d3b0", ENV{ID_SOFTWARE_RADIO}="1", MODE="0660", GROUP="plugdev"

# Dexatek DK DVB-T Dongle (Logilink VG0002A) (FC2580)
SUBSYSTEMS=="usb", ATTRS{idVendor}=="1d19", ATTRS{idProduct}=="1101", ENV{ID_SOFTWARE_RADIO}="1", MODE="0660", GROUP="plugdev"

# Dexatek DK DVB-T Dongle (MSI DigiVox mini II V3.0)
SUBSYSTEMS=="usb", ATTRS{idVendor}=="1d19", ATTRS{idProduct}=="1102", ENV{ID_SOFTWARE_RADIO}="1", MODE="0660", GROUP="plugdev"

# Dexatek DK 5217 DVB-T Dongle (FC2580)
SUBSYSTEMS=="usb", ATTRS{idVendor}=="1d19", ATTRS{idProduct}=="1103", ENV{ID_SOFTWARE_RADIO}="1", MODE="0660", GROUP="plugdev"

# MSI DigiVox Micro HD (FC2580)
SUBSYSTEMS=="usb", ATTRS{idVendor}=="1d19", ATTRS{idProduct}=="1104", ENV{ID_SOFTWARE_RADIO}="1", MODE="0660", GROUP="plugdev"

# Sweex DVB-T USB (FC0012)
SUBSYSTEMS=="usb", ATTRS{idVendor}=="1f4d", ATTRS{idProduct}=="a803", ENV{ID_SOFTWARE_RADIO}="1", MODE="0660", GROUP="plugdev"

# GTek T803 (FC0012)
SUBSYSTEMS=="usb", ATTRS{idVendor}=="1f4d", ATTRS{idProduct}=="b803", ENV{ID_SOFTWARE_RADIO}="1", MODE="0660", GROUP="plugdev"

# Lifeview LV5TDeluxe (FC0012)
SUBSYSTEMS=="usb", ATTRS{idVendor}=="1f4d", ATTRS{idProduct}=="c803", ENV{ID_SOFTWARE_RADIO}="1", MODE="0660", GROUP="plugdev"

# MyGica TD312 (FC0012)
SUBSYSTEMS=="usb", ATTRS{idVendor}=="1f4d", ATTRS{idProduct}=="d286", ENV{ID_SOFTWARE_RADIO}="1", MODE="0660", GROUP="plugdev"

# PROlectrix DV107669 (FC0012)
SUBSYSTEMS=="usb", ATTRS{idVendor}=="1f4d", ATTRS{idProduct}=="d803", ENV{ID_SOFTWARE_RADIO}="1", MODE="0660", GROUP="plugdev"
save with ctrl+x
restart raspberrypi
sudo reboot
Install docker
sudo apt update
sudo apt install docker-compose docker.io
create station directory.
adjust the directory name, according to your station name.
mkdir ~/station4365
cd ~/station4365
nano docker-compose.yml
copy paste this
version: '3.8'
services:

  rigctld:
    image: librespace/hamlib:latest
    user: '999'
    read_only: true
    environment:
      MODEL: '1'
      PORT: '4532'
    restart: 'unless-stopped'
    command: 'rigctld'

  satnogs_client:
    image: librespace/satnogs-client:master-unstable
    user: '500'
    read_only: true
    init: true
    env_file:
      - ./station.env
    environment:
      SATNOGS_RIG_IP: 'rigctld'
      SATNOGS_RIG_PORT: '4532'
    command: 'satnogs-client'
    device_cgroup_rules:
      - 'c 189:* rwm'
    devices:
      - '/dev/bus/usb'
    volumes:
      - type: 'tmpfs'
        target: '/tmp'
      - type: 'volume'
        source: 'satnogs-client-latest'
        target: '/var/lib/satnogs-client'
    restart: 'unless-stopped'
    stop_grace_period: 1s

volumes:
  satnogs-client-latest:
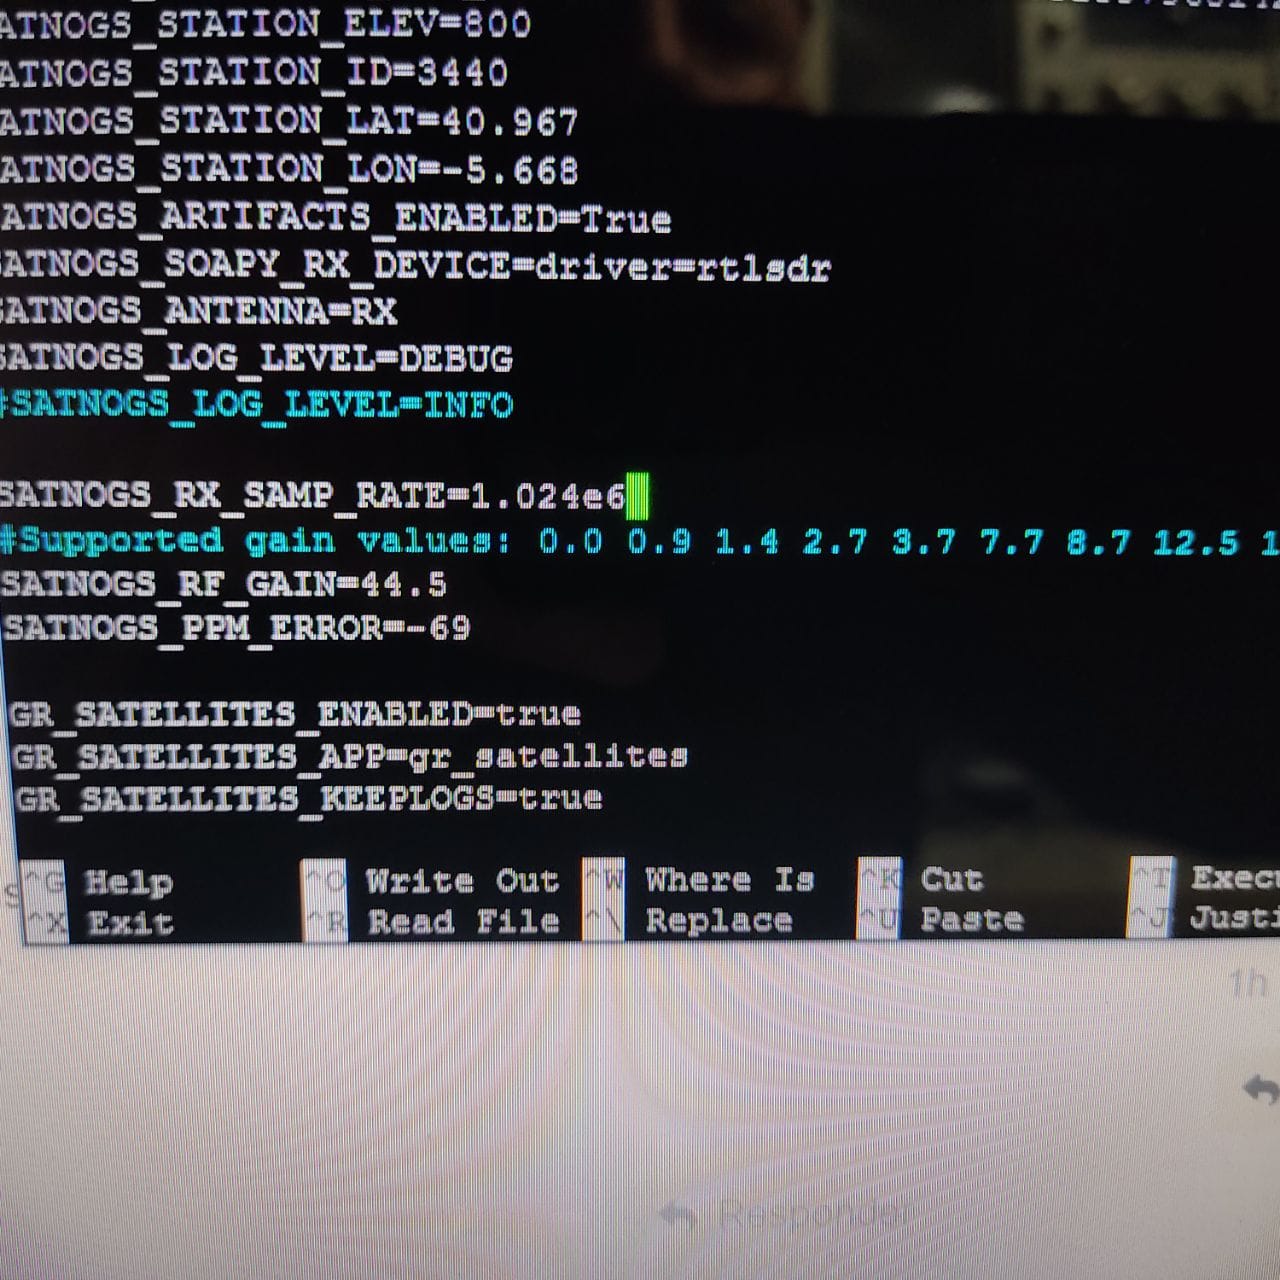
nano station.env
copy paste this
SATNOGS_API_TOKEN=xxx
SATNOGS_ARTIFACTS_API_TOKEN=xxx
SATNOGS_STATION_ELEV=0
SATNOGS_STATION_ID=xxx
SATNOGS_STATION_LAT=xxx
SATNOGS_STATION_LON=xxx
SATNOGS_ARTIFACTS_ENABLED=True
SATNOGS_SOAPY_RX_DEVICE=driver=rtlsdr
SATNOGS_ANTENNA=RX
SATNOGS_LOG_LEVEL=DEBUG
#SATNOGS_LOG_LEVEL=INFO

SATNOGS_RX_SAMP_RATE=2.048e6
#Supported gain values: 0.0 0.9 1.4 2.7 3.7 7.7 8.7 12.5 14.4 15.7 16.6 19.7 20.7 22.9 25.4 28.0 29.7 32.8 33.8 36.4 37.2 38.6 40.2 42.1 43.4 43.9 44.5 48.0 49.6
SATNOGS_RF_GAIN=15.7
SATNOGS_PPM_ERROR=0

GR_SATELLITES_ENABLED=true
GR_SATELLITES_APP=gr_satellites
GR_SATELLITES_KEEPLOGS=true

UDP_DUMP_HOST=0.0.0.0
please change xxx value with your satnogs account.
API_TOKEN get here (API KEY):
ARTIFACTS_API_TOKEN get here
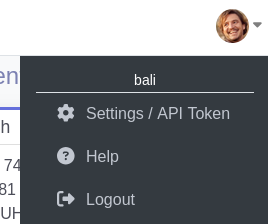
STATION_ID
![]()
you get after click and complete
![]()
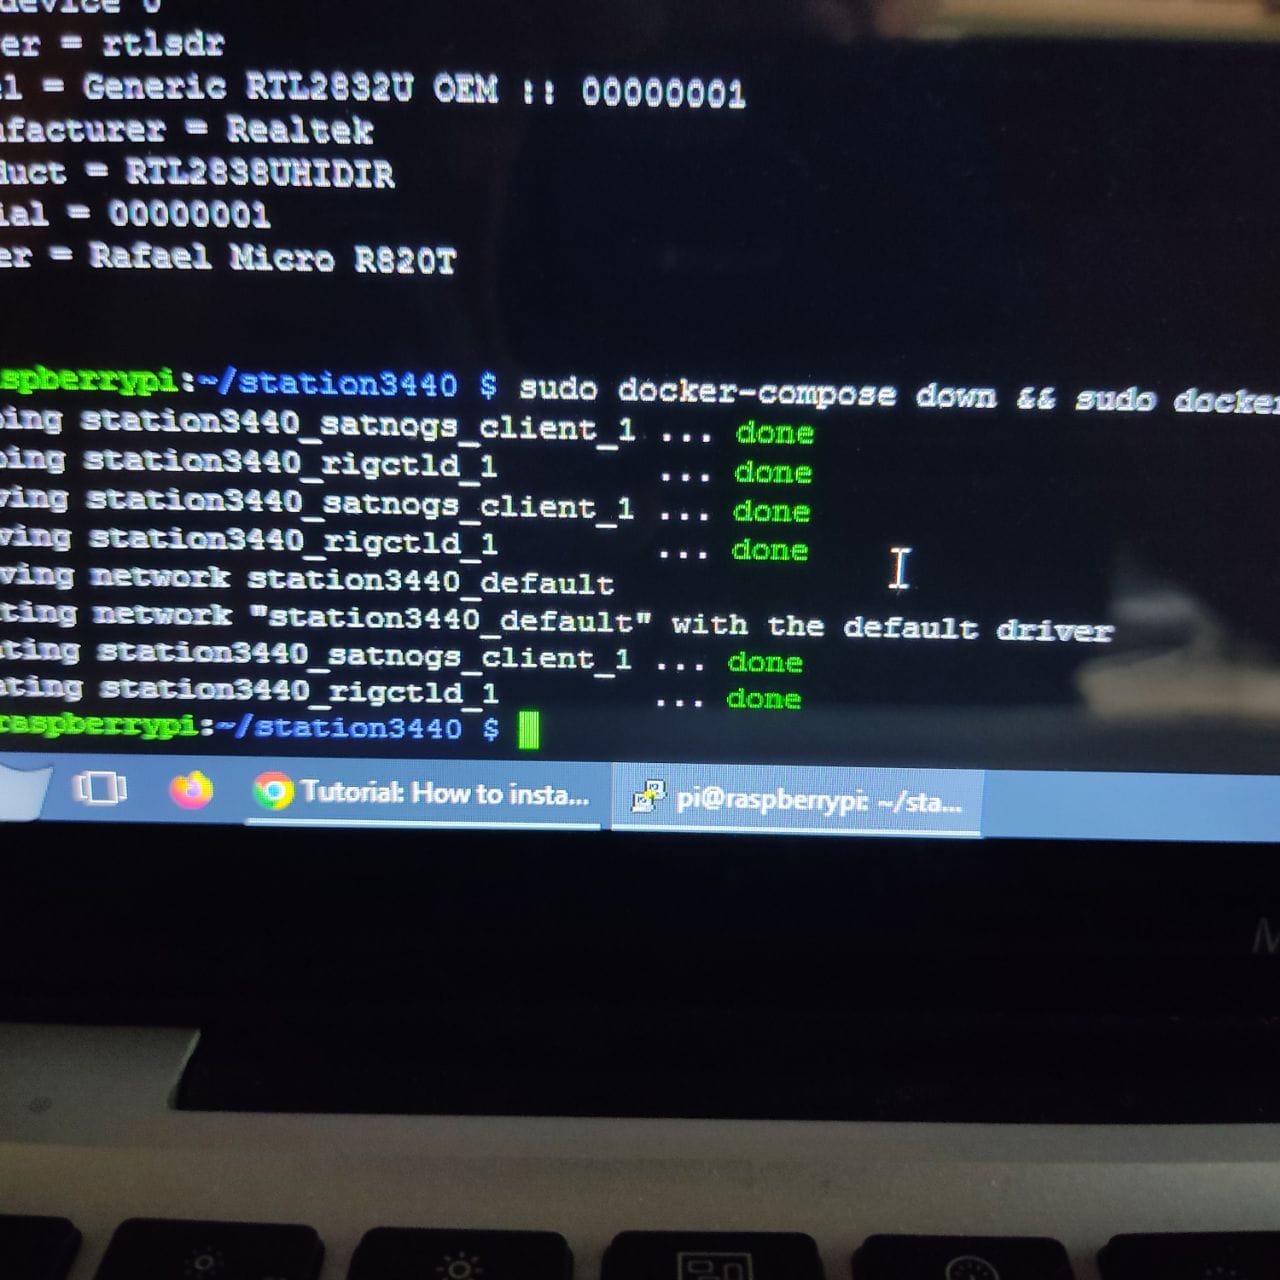
run satnogs-client docker:
cd ~/station4365
sudo docker-compose down && sudo docker-compose up -d
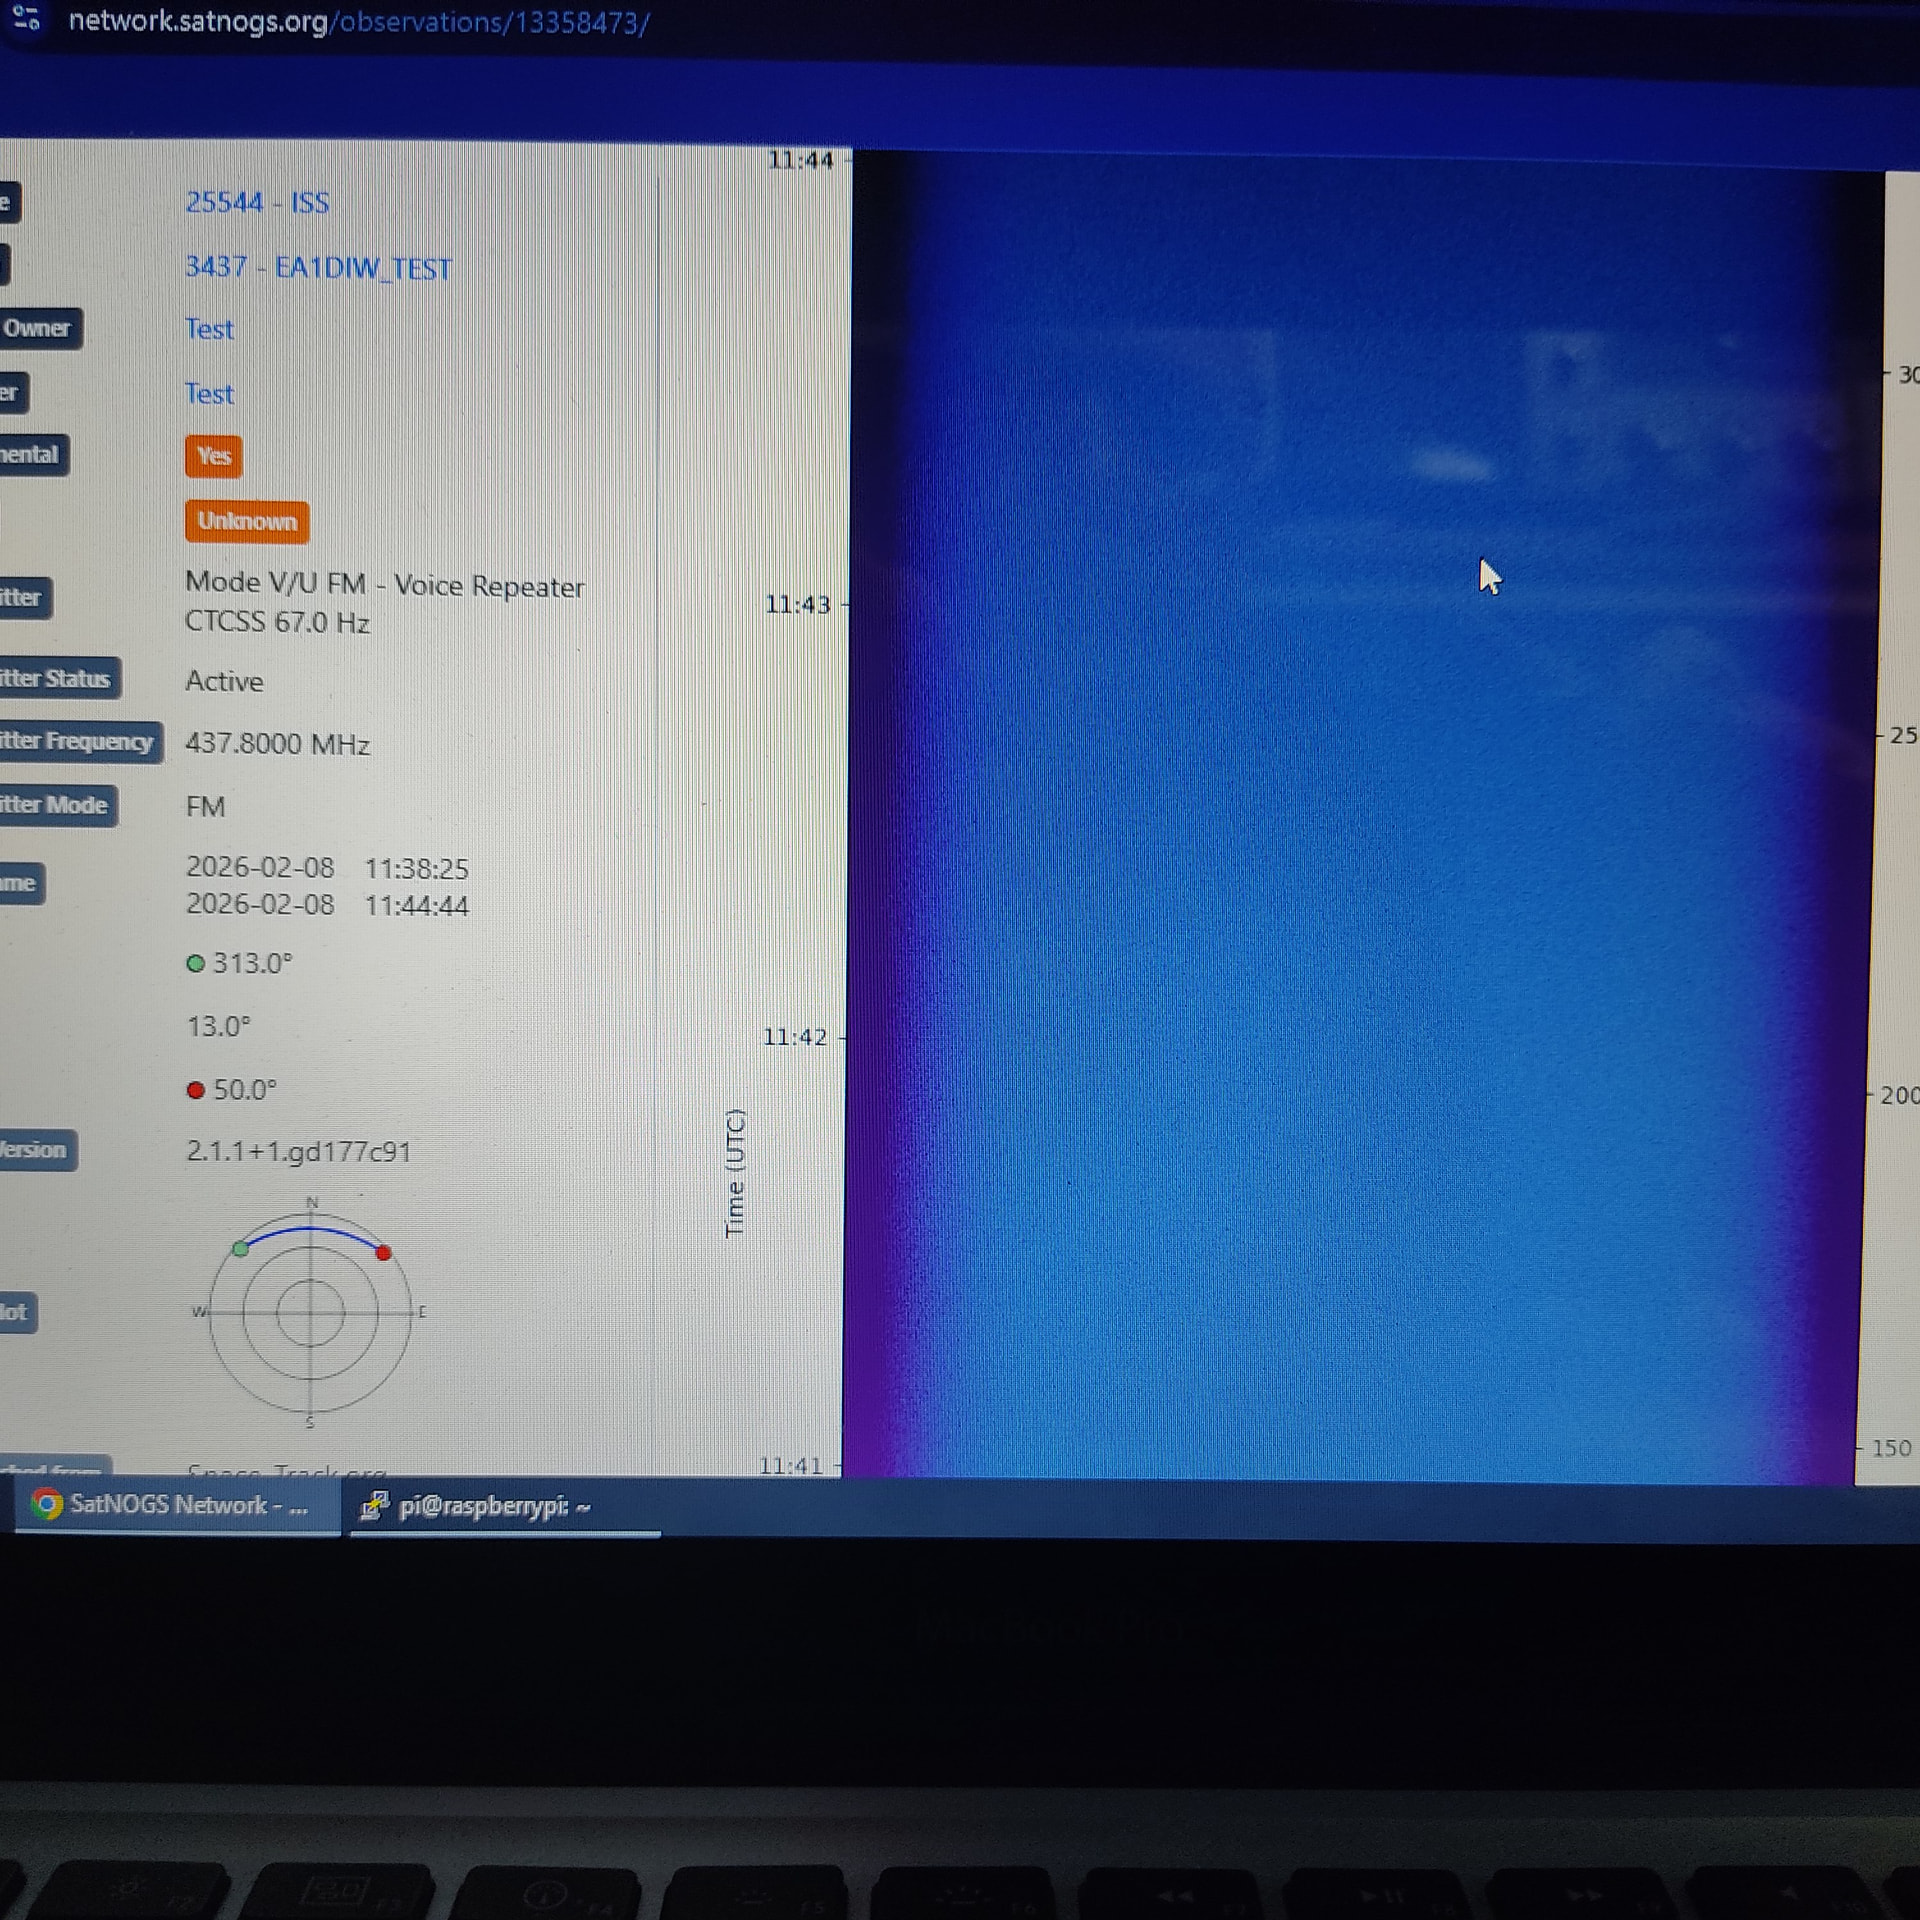
open your browser, and check your satnogs dashboard
it should be green or orange label (testing mode)
![]()
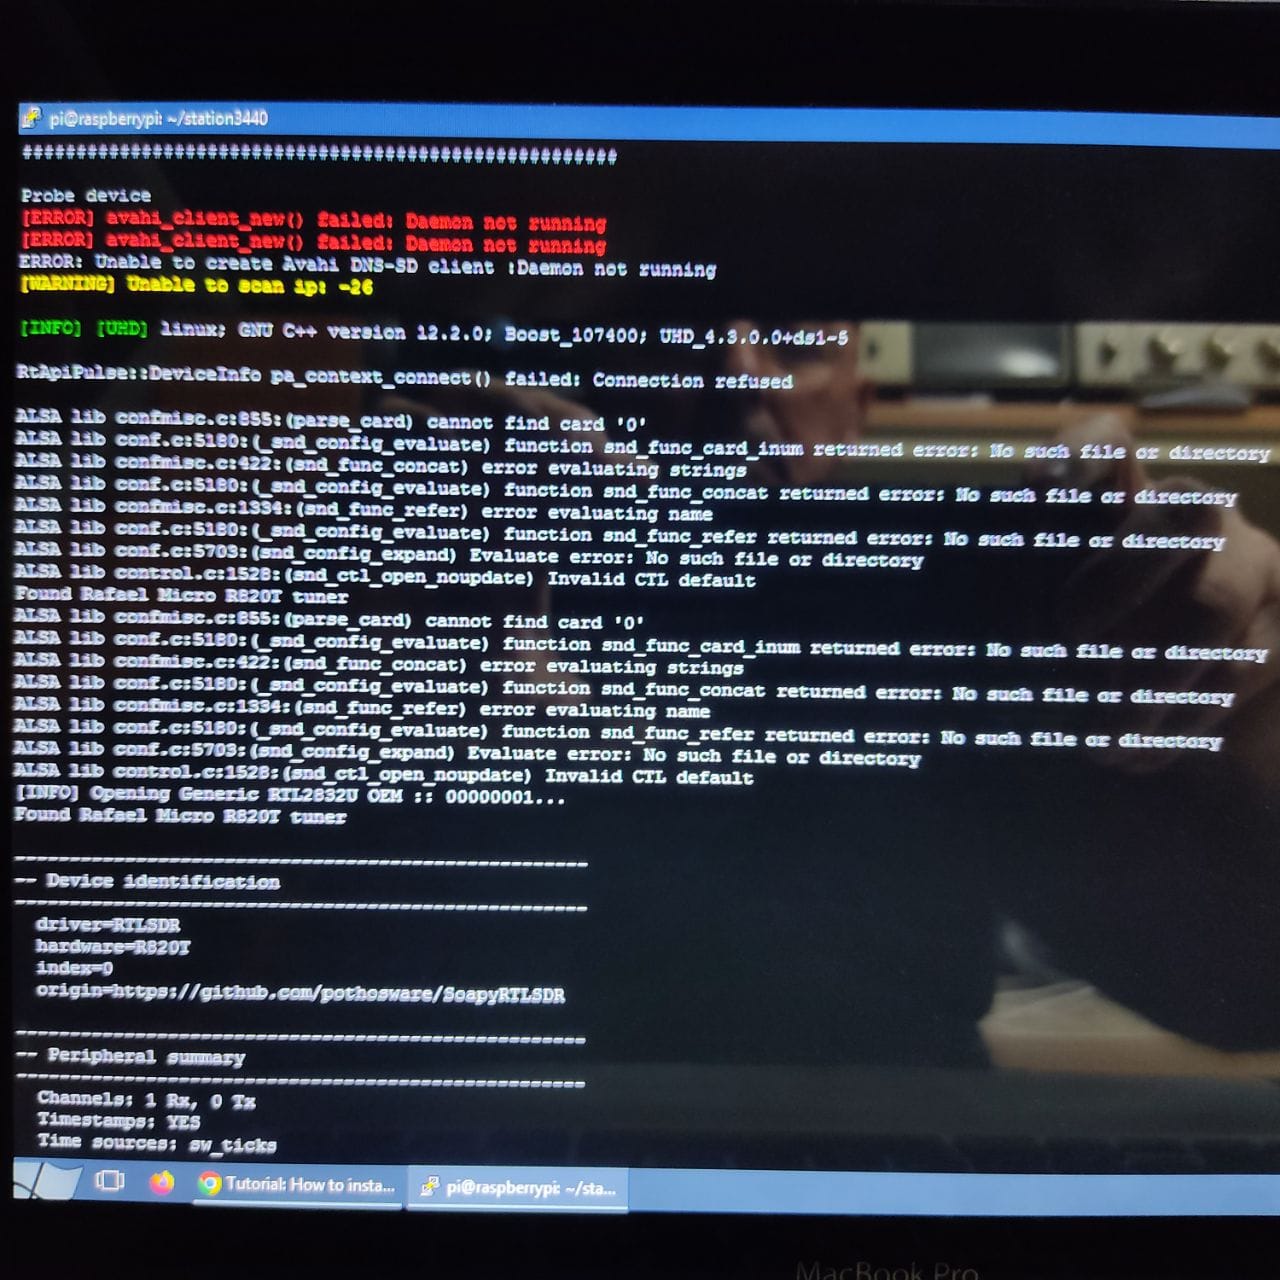
troubleshoot:
check the log:
cd ~/station4365
sudo docker-compose logs -f
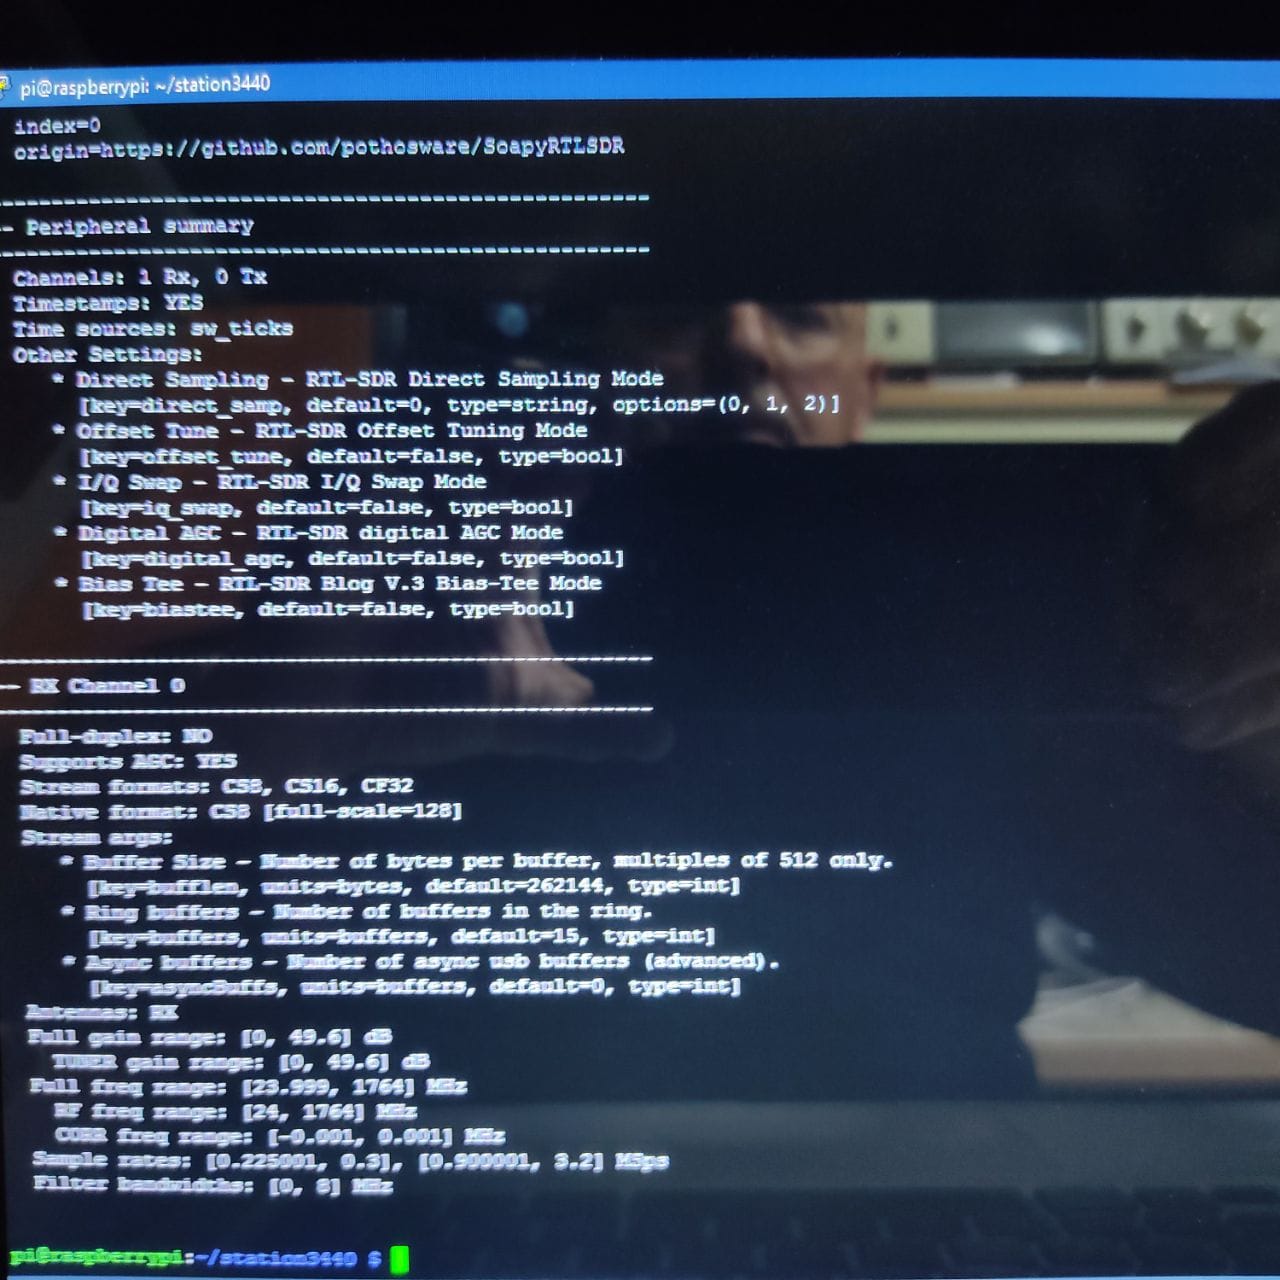
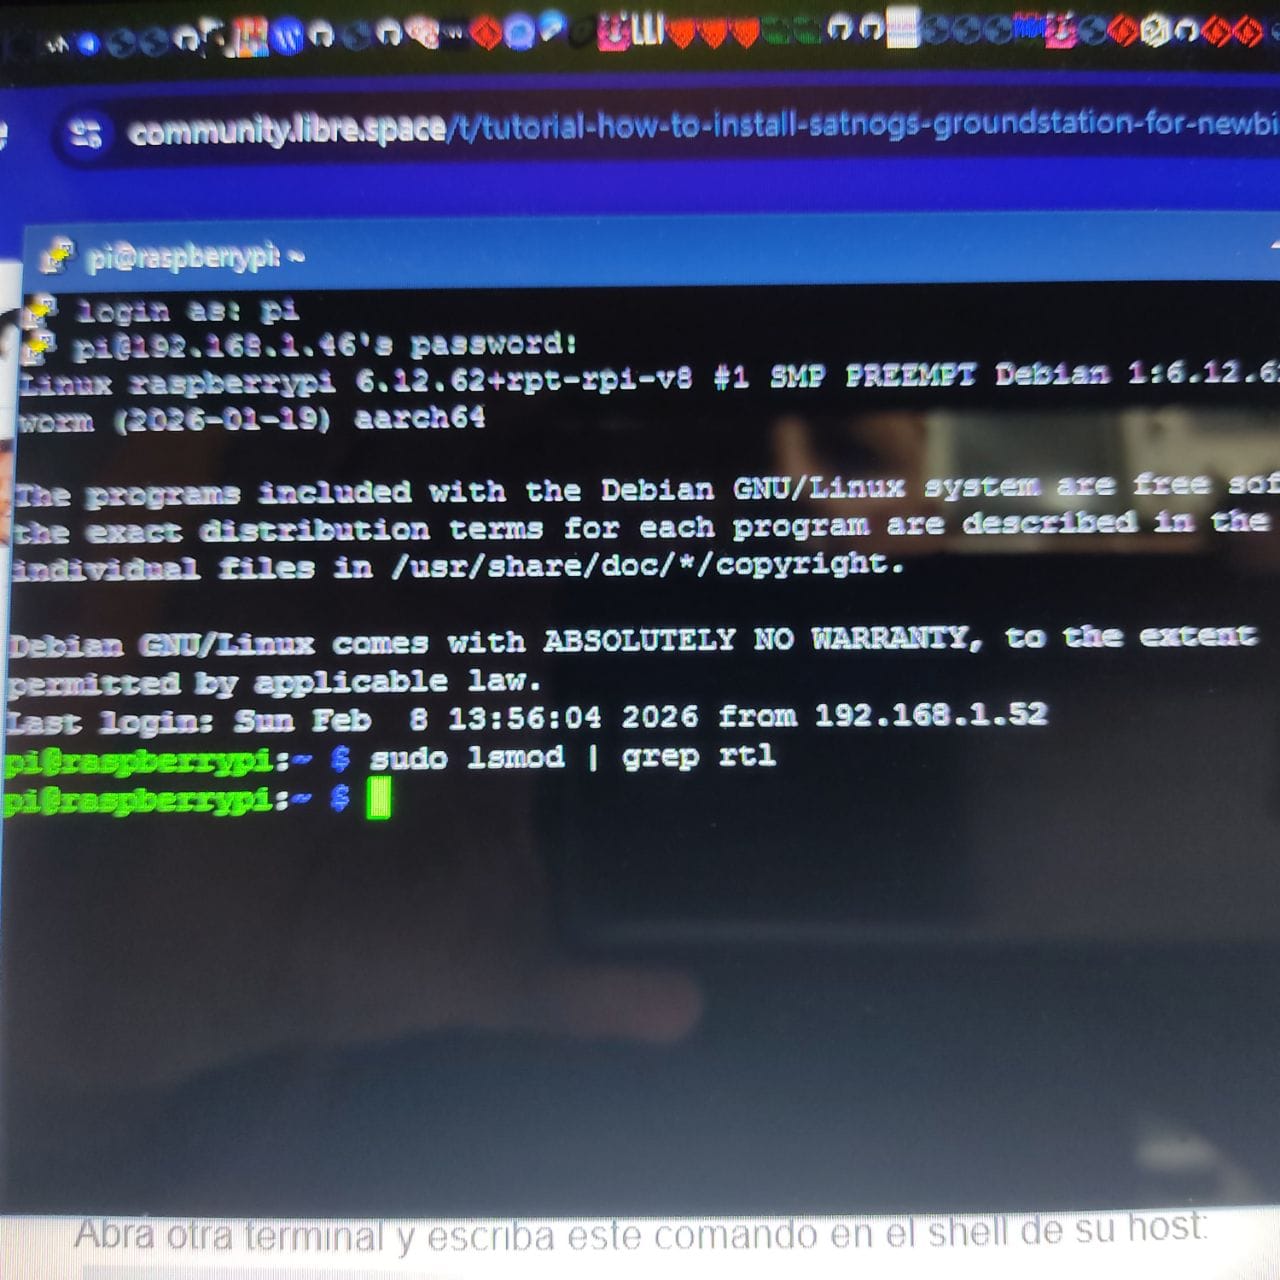
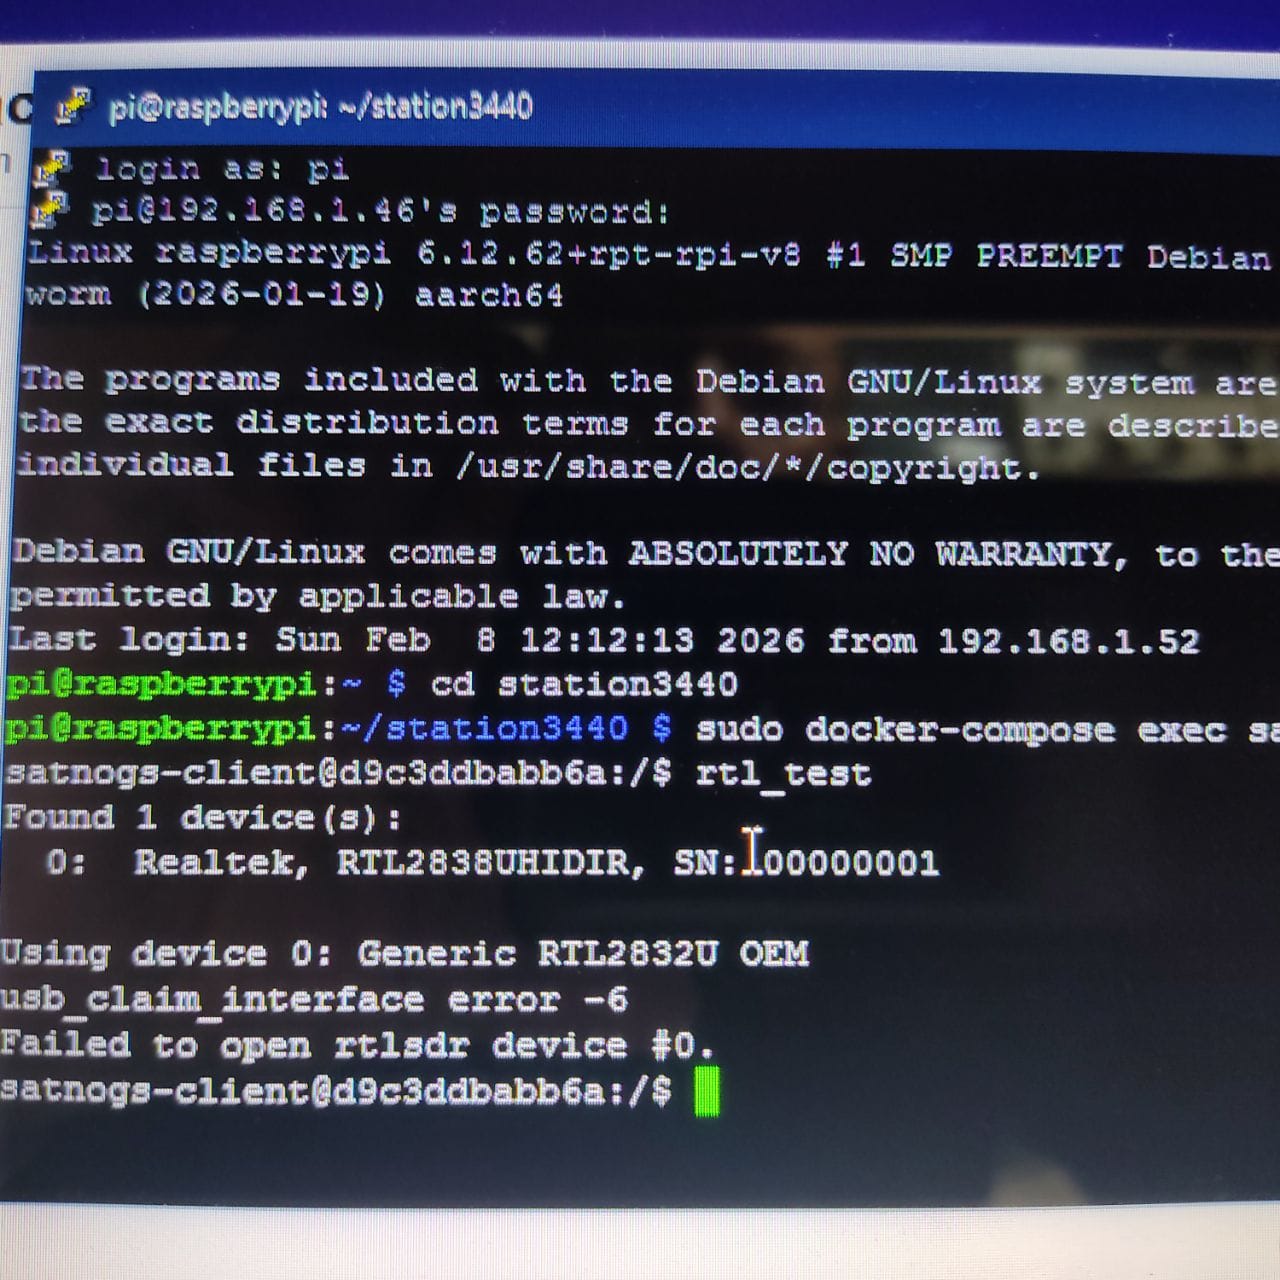
check the sdr:
cd ~/station4365
sudo docker-compose exec satnogs_client SoapySDRUtil --probe
you should see your SDR there, it will seen like this:
Found Rafael Micro R828D tuner
RTL-SDR Blog V4 Detected
Found Rafael Micro R820T tuner
please ![]() if it work for you. thank you!
if it work for you. thank you!
for additional addon to:
- decode satellite photo from meteor-m2-3/4 satellites, follow this link
- decode SSTV image (ISS SSTV, UmKA, Sonate, IO86, etc), follow this link
rtl-sdr.rules.txt (7.5 KB)