TL;DR: Got Meteor M2 Weather satellite decoding. Here are the steps:
Intro
I am new to Satnogs, and had just bought a Raspberry Pi 4 and a RTL-SDR dongle with the dipole antenna kit. I received some NOAA satellites, and was wondering why the Meteor M2 (40069) did not work. Looking at another station that uploaded beautiful pictures, I soon realized that my waterfall was to narrow. Searching this forum I found a lot of information (https://community.libre.space/t/meteor-mn2-decoder-for-rpi-3b/ and https://community.libre.space/t/demodulate-lrpt-from-satnogs-iq-file/6167), but it seemed a bit out dated, and it was not a straight forward manual. I was also a bit surprised that Meteor M2 was not supported out of the box. I decided to give it a try and also document the steps. The fun part in doing so, is that I learned a lot!
Step 1: Install LRPT
The Meteor is using LRPT modulation, which needs to be added. Installing LRPT, requires cmake to be available on the Raspberry Pi. It can be installed with:
sudo apt-get install cmake
Next is somewhat based upon the README.md of Files · lrpt · Mat Burnham / satnogs-flowgraphs · GitLab. Clone the repository and switch to the LRPT branch and compile the source:
cd ~
git clone https://gitlab.com/matb/satnogs-flowgraphs.git
cd satnogs-flowgraphs
git checkout lrpt
mkdir build
cd build
cmake ..
make
Here I made a small mistake. After make, I issued the make install, but I probably shouldn’t. Because it overwrites a couple of files, containing the other demodulators. I did not want that, but I realized it too late. Do NOT issue: sudo make install as this will install everything. See:
[  7%] Built target sstv_pd120_demod
[ 15%] Built target iq_receiver
[ 23%] Built target bpsk
[ 30%] Built target cw_decoder
[ 38%] Built target example_flowgraph
[ 46%] Built target fm
[ 53%] Built target afsk1200_ax25
[ 61%] Built target fsk
[ 69%] Built target argos_bpsk_ldr
[ 76%] Built target amsat_fox_duv_decoder
[ 84%] Built target lrpt_demod
[ 92%] Built target noaa_apt_decoder
[100%] Built target reaktor_hello_world_fsk9600_decoder
-- Install the project...
-- Install configuration: ""
-- Installing: /usr/local/bin/satnogs_afsk1200_ax25.py
-- Installing: /usr/local/bin/satnogs_bpsk.py
-- Installing: /usr/local/bin/satnogs_cw_decoder.py
-- Installing: /usr/local/bin/satnogs_example_flowgraph.py
-- Installing: /usr/local/bin/satnogs_fm.py
-- Installing: /usr/local/bin/satnogs_fsk.py
-- Installing: /usr/local/bin/satnogs_iq_receiver.py
-- Installing: /usr/local/bin/satnogs_sstv_pd120_demod.py
-- Installing: /usr/local/bin/satnogs_amsat_fox_duv_decoder.py
-- Installing: /usr/local/bin/satnogs_argos_bpsk_ldr.py
-- Installing: /usr/local/bin/satnogs_lrpt_demod.py
-- Installing: /usr/local/bin/satnogs_noaa_apt_decoder.py
-- Installing: /usr/local/bin/satnogs_reaktor_hello_world_fsk9600_decoder.py
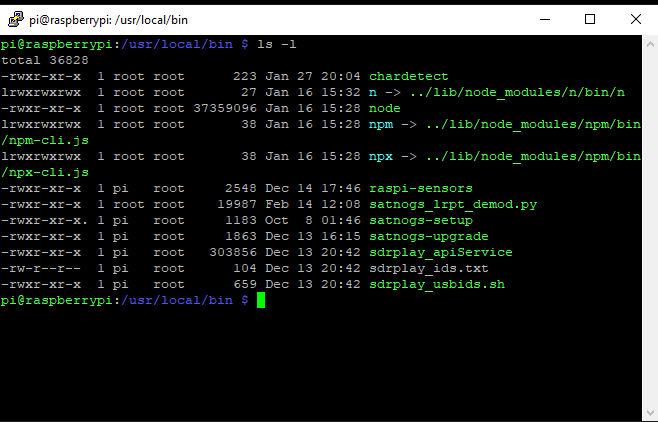
This worked for me, and it suggest to place the files in /usr/local/bin. But this did not work for others. They needed to place the satnogs_lrpt_demod.py in /usr/bin. I suggest you find out where your already installed demodulator python files are by issueing:
ls -l /usr/local/bin/*.py
ls -l /usr/bin/*.py
One of these two commands should give a folder like:
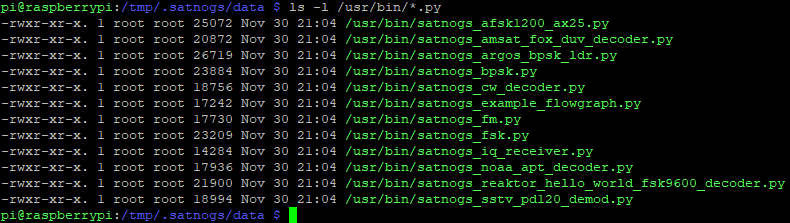
Copy build/satellites/satnogs_lrpt_demod.py to the same folder as where the other demodulator python files are:
sudo cp satellites/satnogs_lrpt_demod.py /usr/bin/
cd /usr/bin
sudo chown root:root satnogs_lrpt_demod.py
sudo chmod +755 satnogs_lrpt_demod.py
If you are running satnogs client 1.5 or newer, then this file needs an update. There where some changes between version 1.4 and 1.5, which are not backwards compatible. Edit the satnogs_lrpt_demod.py file and added support for 4 new arguments to the definition:
sudo nano satnogs_lrpt_demod.py
Find the definition argument_parser:
def argument_parser():
At the end of it add:
    parser.add_argument(
        "--udp-IP", dest="udp_IP", type=str, default="127.0.0.1",
        help="Set udp_IP [default=%(default)r]")
    parser.add_argument(
        "--udp-dump-host", dest="udp_dump_host", type=str, default="",
        help="Set udp_dump_host [default=%(default)r]")
    parser.add_argument(
        "--udp-dump-port", dest="udp_dump_port", type=intx, default=57356,
        help="Set udp_dump_port [default=%(default)r]")
    parser.add_argument(
        "--udp-port", dest="udp_port", type=intx, default=16887,
        help="Set udp_port [default=%(default)r]")
That is just before:
return parser
The demodulator is in place, but Satnogs still does not about know it. We need to edit some python script file to add it. Python uses indentation to figure out what blocks of code belong to each other. Make sure that you have the right amount of spaces for each line! Following this post https://community.libre.space/t/meteor-mn2-decoder-for-rpi-3b/2493/140. The file is located here:
cd /var/lib/satnogs/lib/python3.7/site-packages/satnogsclient/radio
sudo nano flowgraphs.py
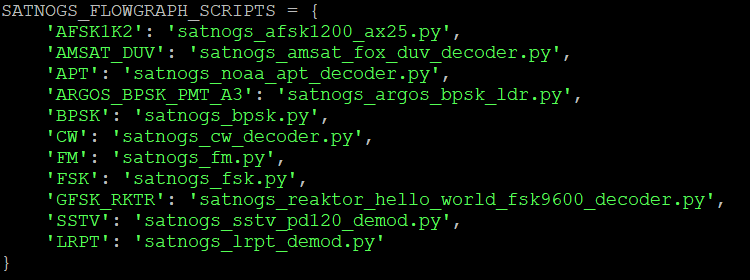
Append to
    SATNOGS_FLOWGRAPH_SCRIPTS = {
    ,
    'LRPT': 'satnogs_lrpt_demod.py'
Don’t forget to add a , to the previous line! and make sure it looks like this:
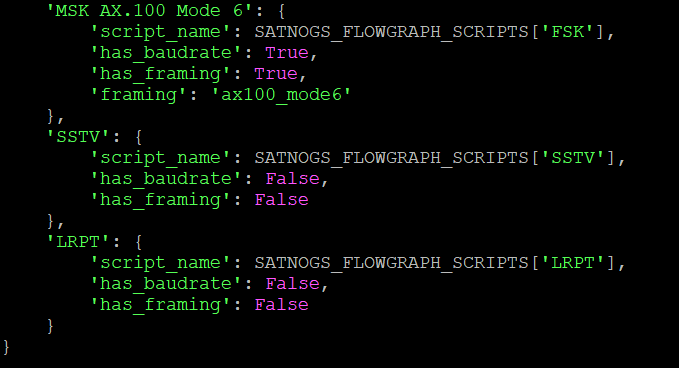
Append to
    SATNOGS_FLOWGRAPH_MODES = {
        ,
        'LRPT': {
            'script_name': SATNOGS_FLOWGRAPH_SCRIPTS['LRPT'],
            'has_baudrate': False,
            'has_framing': False
        }
Again, add the , to the previous line! Last part of the SATNOGS_FLOWGRAPH_MODES variable should look like this:
The satnogs-client needs to be restarted to adapt these changes, either by
sudo systemctl restart satnogs-client
Or rebooting the Raspberry Pi.
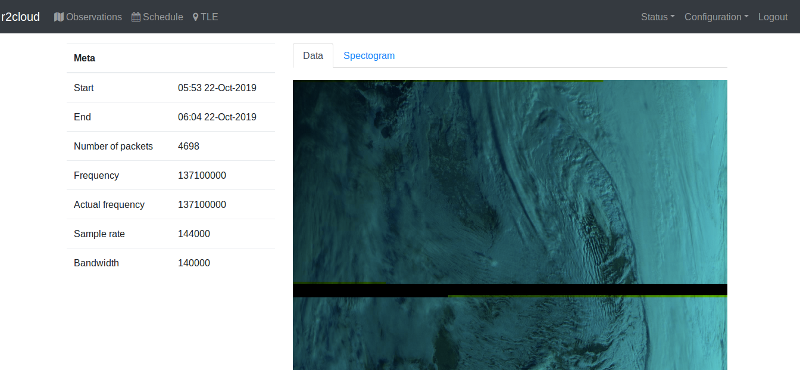
Now we have completed the first step we can test this step. Schedule a Meteor M2 40069 pass and watch the /tmp directory during the observation. There should be a .s file placed like: data_3618506_2021-02-10T07-58-37.s and your waterfall should have a bandwidth from at least -60 to +60kHz:

Step 2: Decode to images
Now we have a successful recording of the satellite, we need to add a post observation script to process the data and generate the images. This script however depends on two binaries that need to be installed. One is artlav meteor_decoder, https://github.com/artlav/meteor_decoder. Luckily a binary is provided. Download medet_190825_arm.tar.gz from http://orbides.org/page.php?id=1023:
cd ~
mkdir medet
cd medet
wget https://orbides.org/etc/medet/medet_190825_arm.tar.gz
tar xvfz medet_190825_arm.tar.gz
Which gives:
-rwxr-xr-x   1 pi pi 158380 Aug 25  2019 medet_arm
-rw-r--r--   1 pi pi   2035 Aug 25  2019 readme.txt
We can test medet_arm by running:
./medet_arm
This should give the help message.
Second binary needed is convert by ImageMagick:
sudo apt-get install imagemagick
Now the post processing script is needed:
cd ~
git clone https://github.com/darksidelemm/satnogs-extras.git
This will give the post processing script process_meteor.py in /satnogs-extras/scripts We need to edit this script a bit, to point to the two binaries it uses.
cd satnogs-extras/scripts
nano process_meteor.py
Change the path of Medet to where the medet_arm binary lives. The path of convert does not need to be changed:
MEDET_PATH = "/home/pi/medet/medet_arm"
CONVERT_PATH = "convert"
A few lines further I also changed the waiting time to 10 seconds:
WAIT_TIME = 10
Next run it manually on the previously received .s file.
sudo python ./process_meteor.py
This will take a few minutes and result in:
Waiting for 10 seconds before processing.
Attempting to process: /tmp/data_3614689_2021-02-09T18-07-17.s
Total:        159.856415
Processing:   2.866195
Correlation:  78.260475
Viterbi:      71.765358
ECC:          6.951093
Remainder:    0.013307
Packets:      1504 / 4342
Elapsed time: 00:03:32.988
convert-im6.q16: length and filesize do not match `/tmp/meteor_image_temp_vis.bmp' @ warning/bmp.c/ReadBMPImage/839.
Total:        2.846459
Processing:   2.844458
Correlation:  0.000000
Viterbi:      0.000000
ECC:          0.000000
Remainder:    0.002001
Packets:      1504 / 1504
Elapsed time: 00:03:32.988
convert-im6.q16: length and filesize do not match `/tmp/meteor_image_temp_ir.bmp' @ warning/bmp.c/ReadBMPImage/839.
VIS processing successful!
IR processing successful!
Two images are written to /tmp/.satnogs/data to be uploaded:
-rw-r--r-- 1 root    root     532430 Feb 10 10:01 data_3614689_2021-02-09T18-07-17_ir.png
-rw-r--r-- 1 root    root    1073324 Feb 10 10:01 data_3614689_2021-02-09T18-07-17_vis.png
The processed *.s files are moved from /tmp to /tmp/.satnogs/data/complete. Check if this directory already exists. Otherwise:
cd /tmp/.satnogs/data
sudo mkdir complete
sudo chown satnogs:satnogs complete
ls -l
Should give:
drwxr-xr-x 2 satnogs satnogs 40 Feb 14 13:09 complete
drwxr-xr-x 2 satnogs satnogs 40 Feb 13 10:16 incomplete
Step 3: Add post observation script
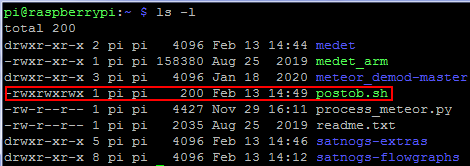
To finalize the automation, make a post observation script:
cd ~
nano postob.sh
Add the following:
#!/bin/bash
echo "POST OBSERVATION SCRIPT RUNNING"

#Maybe you need to do something with the Bias T:
#/home/pi/rtl_biast/build/src/rtl_biast -b 0
python /home/pi/satnogs-extras/scripts/process_meteor.py  "$1" "$2" "$3" "$4"

echo "POST OBSERVATION SCRIPT FINISHED"
Make it executeable:
sudo chmod +777 postob.sh
Edit your Satnogs setup to run this script:
sudo satnogs-setup
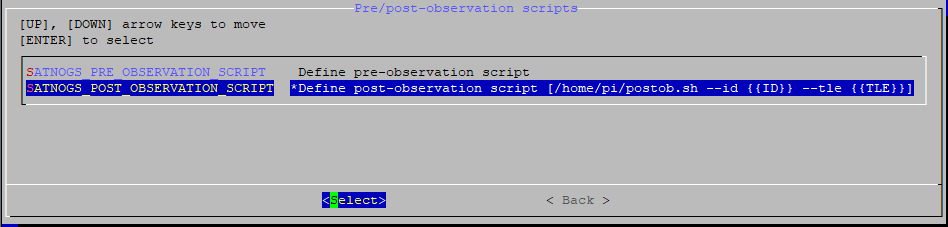
Go to Advanced → Scripts → SATNOGS_POST_OBSERVATI. Type:
/home/pi/postob.sh --id {{ID}} --tle {{TLE}}
Should look like:
Step 4: Finished
That’s it, it should work now. Schedule another pass of Meteor M2 (40069) and see if the images get uploaded. See this observation https://network.satnogs.org/observations/3618506/#tab-data for the following image:

Step 5: Tweaking
After running this for some time, I found that a few things can be improved. But this is also a matter of personal taste. A problem is that the complete directory goes missing after a reboot, and the temporary files that are stored there are gone. But if everything works, there is no reason to store these files anyway, and we can have them removed. Secondly the images can use a bit of photoshop. Luckily we have the utility convert already working in the process_meteor.py script, which can easily do these photoshop tasks. I like the pictures to have North pointing up, but if the satellite flies from south to north, it gets upside down. The convert can fix this with the -rotate 180 argument. The infrared image has the colors flipped. I like the clouds to be white and the sea to be black, but currently that is the other way around. The -negate argument fixes this. The color range used is quite small, giving a low contrast. There are several options to fix this, I used -linear-stretch. So fire up nano to edit the script:
cd ~
cd satnogs-extras/scripts/
cp process_meteor.py process_meteor.backup
nano process_meteor.py
We are going to rotate based on time. Of course it should be better to use the TLE to figure out which way the Meteor satellite is flying, but that is a future project  So for time, Add
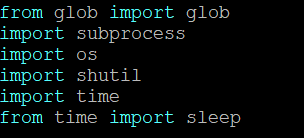
import time
At the imports:
Next locate the define of convert_image, and replace the code with:
def convert_image(suffix = ""):
    """
    Use the 'convert' utility (from imagemagick) to convert
    a set of resultant METEOR images.
    """

    raw_image_path = TEMP_DIR + TEMP_FILENAME + suffix + ".bmp"
    result_image = TEMP_DIR + TEMP_FILENAME + suffix + ".png"
    # get the current time.
    hour = time.localtime(time.time()).tm_hour

    # Call convert to convert the image
    # Check the suffix.
    if suffix == "_ir":
        # suffix is ir, need to -negate to invert colors, and -linear-stretch to improve contrast
        # Check time
        if (hour>12):
            # After 12 UT, so evening pass, need to rotate
            subprocess.call([CONVERT_PATH, "-negate", "-rotate", "180", "-linear-stretch", "1x1%", raw_image_path, result_image])
        else:
            # Before 12 UT, morning pass no need to rotate
            subprocess.call([CONVERT_PATH, "-negate", "-linear-stretch", "1x1%", raw_image_path, result_image])

    else:
        # suffix is vis.
        if (hour>12):
            # After 12 UT, so evening pass, need to rotate
            subprocess.call([CONVERT_PATH, "-rotate", "180", raw_image_path, result_image])
        else:
            # Before 12 UT, morning pass no need to rotate
            subprocess.call([CONVERT_PATH, raw_image_path, result_image])


    # See if a resultant image was produced.
    if os.path.isfile(result_image):
        return result_image
    else:
        return None
Depending on your time zone you may need to set the time of 12 UT to some other value to get a clear separation between the two type of passes. Also you can add or remove arguments to convert, if you like to change the images a bit more.
Almost at the end of the file there is a move command to move the .s file to the complete directory. i replaced it with a remove:
        # Move file processed file into complete directory
        # shutil.move(_file, RAW_DESTINATION_DIR + os.path.basename(_file))
        # Replaced the move, with remove:
        os.remove(_file)
Now save the file, and schedule some passes, to check if the pictures get north up, and if the infrared looks a bit more dramatic like:

Update 14-02-2021:
Added a sudo to the copy command, and added 2 pictures of how the file flowgraphs.py should look. Also added the creation of the complete directory.
Update 15-02-2021:
Added setting of rights and owner of satnogs_lrpt_demod.py
Update 16-02-2021:
Changed folder of satnogs_lrpt_demod.py to /usr/bin
Added screenshot of satnogs-update showing post observation script. Improved the command blocks.
Update 18-02-2021:
Updated the postob.sh script to include a few echos to allow easier debugging. Added the Tweaking step.
Update 16-06-2021:
Added compatibility for satnogs client 1.5 by adding support for 4 new arguments to the definition of argument_parser.
I hope this helps others to get images from Meteor M2. Feel free to comment and improve! But be aware I don’t have all the answers! Best regards, Eelke.