Hello,
I want build myself my first satNOGS rotator, but I came up with a question that I can not figure out.
I am planning on using NEMA 17 stepper motors. Do I still have to use rotary encoders? Or are these optional for the stepper motor version?
Thanks in advance!
Hi crosswalkersam,
The rotary encoders are optional when using the stepper motor version.
The endstop switches do a very good job alone.
You will have lots more questions, don’t hesitate to ask.
Regards
Steve VK4SMC
2 Likes
Thank you, in that case I will skip them.
I actually have another question: How do I prevent the lower mast from “slipping” through the bottom construction? As far as I understand it, the whole weight of the rotator is on the gears and 4 set screws, is that right?
Hi,
The rotator is supported by 4 set screws on the shaft collar(shaft gear), plus 4 screws in the encoder gear, which you need to include even if not using encoder.
This, with a very snug fit through the bearings, supports the rotator.
Hope that makes sense.
Steve
1 Like
I might add some threadlock to secure the shaft to the ball bearing.
Just for some extra riggidity.I have two more questions:
- Is the rotator suitable for a permanent installation? I am a bit concerned that some 3D printed parts might deform if it sits in the sun for too long.
- How many Amps should the PSU have? I have two options: 15V@4A or 12V@17A.
Sam
Hi Sam,
I’ve just remembered that on the shaft I drilled into (not through) the aluminum just enough so the setscrews had a bit of grip. I did this after a few months when I noticed it was a bit too loose.
As for
1.
I have my rotator enclosed in a aluminum box made from very thin (1mm?) sheet,
Purchased from hardware store.
This stuff is very easy to bend and cut, but robust enough to stop the elements.
It also helps stop RFI from the stepper motors interfering with the RTL-SDR or the RPi’s wifi, which are both in separate plastic enclosures.
It’s all been outside for WELL over a year with zero plastic problems.
2.
Just had a look a current draw with a reading from my solar regulator’s load (Rotator) -
0.5A when steppers moving and 0.2A when idle at 12V (I would only take this as rough guide)
My setup is 2 x 100 AH 12V SLA deep cycle Batteries in parallel.
This is charged by two 160W solar panels through a proper MPPT solar regulator.
May seem like overkill but we often get days of rain/overcast conditions in a row and since installed hasn’t needed a top up charge for over 6 months.
Both of your power supplies will be able to to handle the load of the rotator.
I would choose the one with less RFI, VHF is the worst for me.
Also if you are using the Satnogs Rotator Controller remember you will need to change a few components to cater for the lower voltages.
This is getting too long winded now, I hope it all makes sense.
Regards
Steve
2 Likes
Hello Steve,
thanks for the help, I appreciate it.
I used PETG instead of ABS, but I dont think thats a problem. I just finished all the 3D printed parts.
The 2020 should arrive next weekend, and then I will build it.
I used the Arduino Uno + CNC shield option which supports 12-36V. The Arduino is powered through the USB, so higher voltages should be fine I guess.
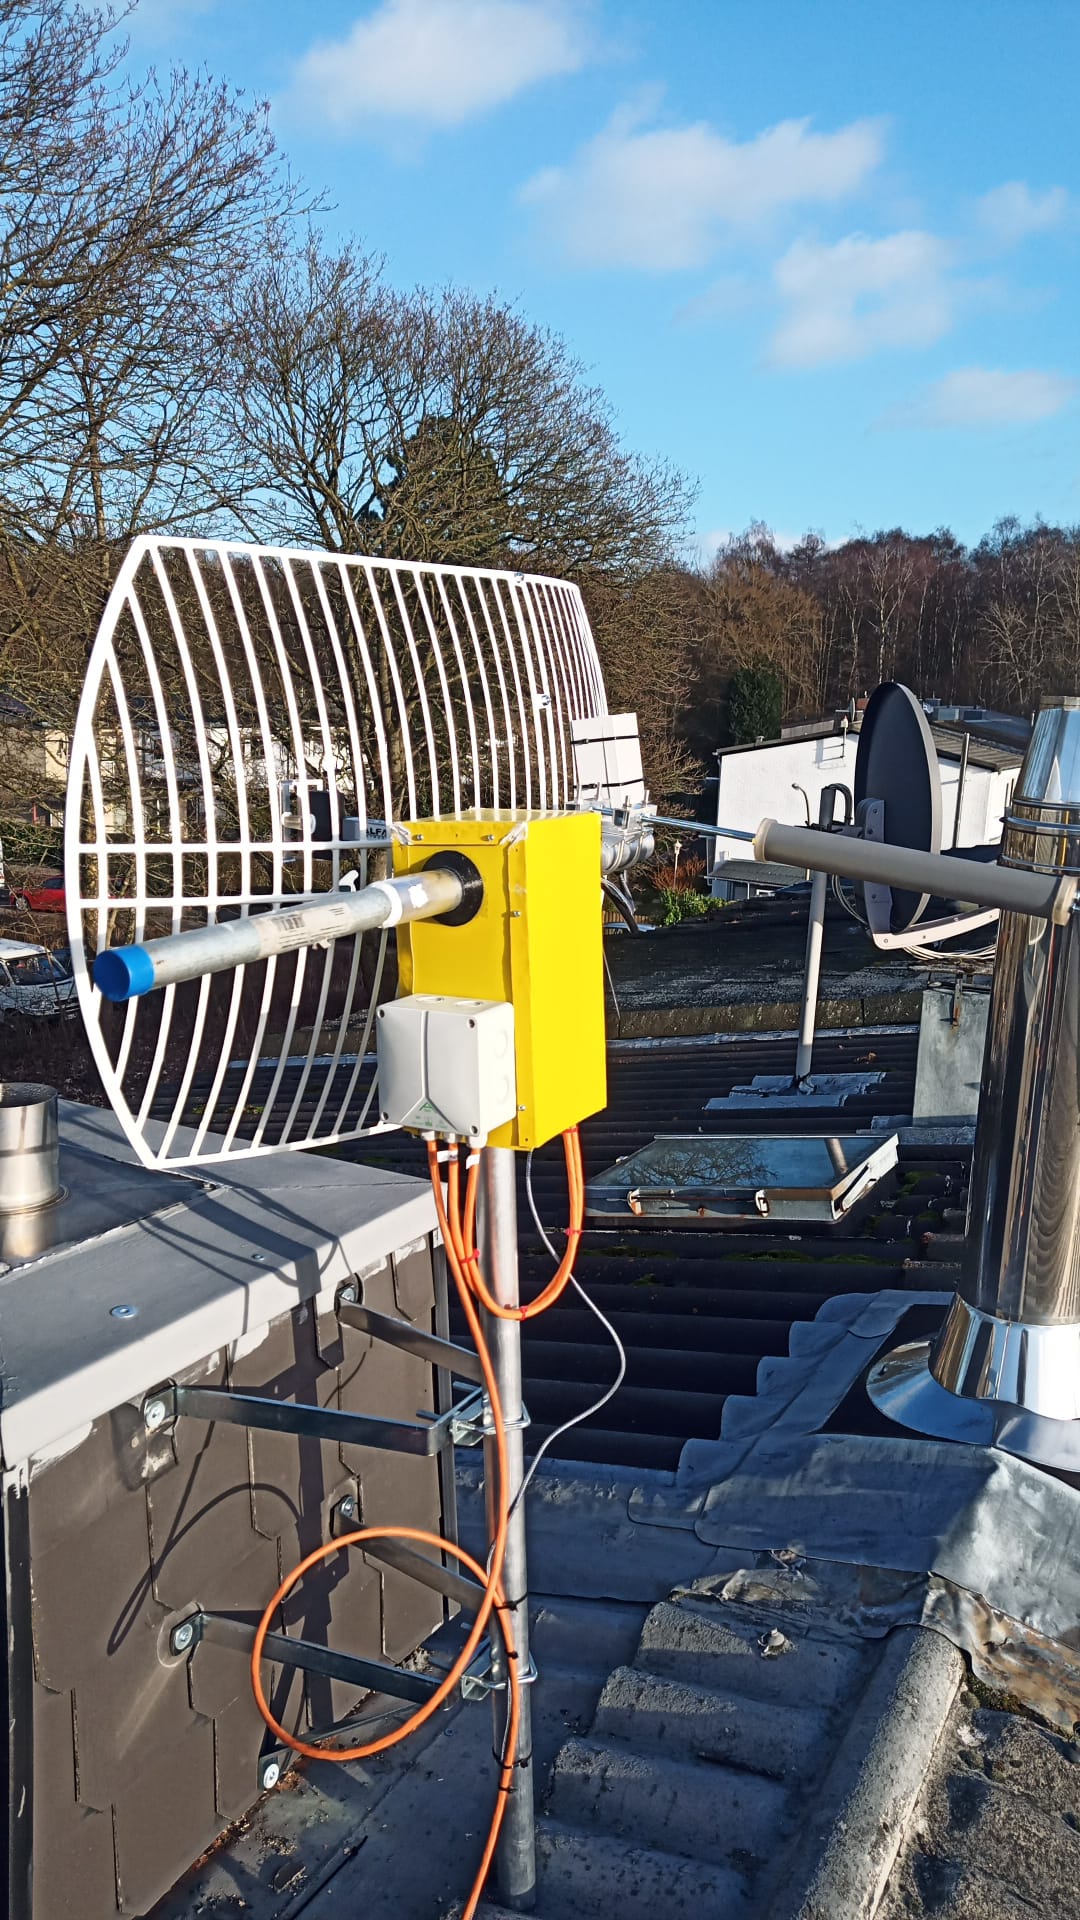
I was planning on using it for HRPT with a 2.4GHz Grid antenna. I reckon it should be possible if I use a counterweight? But I am a bit concerned how it will behave during e.g. a storm. Do you think it will hold up?
Sam
Hi Sam,
Counterweights are a must with any antenna on this rotator.
Storms, Mine have been through several, rotator generally fine.
As for my homebrew antenna not so fine.
Can’t stop nature.
Good luck with the build.
Keep us updated.
Steve
Hi Steve,
I just completed the assembly. However, the motors do not work.
They go forward 1/4 rotation, backward 1/4 rotation and then just stop and apply holding torque.
If I use a different motor (same model, just nothing mounted to it) it works fine.
I am guessing the motors do nat have enough torque, but usually that would result in lost steps and not a backwards rotation. Or am I mistaken?
Any ideas?
Sam
EDIT: Turns out I am just very stupid. I put the End-Stop wires into the same CAT-7 Wires as the Motorwires. So as soon as the motors start, the motor-current induces a voltage into the End-Stop wires which makes the arduino think the end-stop is reached. I will add some pull-down resistors to fix this.
Hi Sam,
Glad you discovered the cause.
Never would have discovered that for a long time.
My first guess was going to be stepper motor drivers not set correctly.
You’re almost there.
Steve
Okay, its homing correctly now. But it does not have any torque, so I cant actually attach anything to it without the motors stalling.
I set the drivers to 1.7A (since I use 1.7A Motors), but I could increase it to 2A if necessary.
Any tipps on how to reduce the worm gear friction? I turned it with a drill for ca. 5 Minutes at full speed, but its still not as freely moving as I would like it to be.
Sam
EDIT: And again, I found the error myself. My A4988 do not have the standard 0.05 Ohm current resistor, but 0.1 Ohm resistors. So when I thought that I set it to 1.7A, it really was delivering 0.85A only. Now she’s rolling :). I’ll report back once it is set up on the roof.
1 Like
Hi Sam,
Great news.
Before you install on roof, I would setup with easy access for a few passes to test first.
Well done.
Steve
Jup. I have a pretty flat roof, so I can access the rotor whenever i need to.
The drivers get fairly warm (ca. 80°C), can I lower the temperture by bumping up the VMOT voltage?
Sam
Hi Sam,
Not sure about increasing VMOT.
This is my 1st time using these drivers, mine came with a heat sink about twice the size of the 4988 heat sink.
I found this TMC Wiki that may help a little.
Steve
Okay, its done. I still have to calibrate it, it seems to bei ca. 5° off.
But it works and it already survived its first storm with winds of up to 120km/h.
2 Likes
Hi Sam,
Congratulations on the build.
Let the fun begin.
Also in my last post here I sent you a link to wrong stepper drivers,
I must have got a bit mixed up.
I am using TMC2208 drivers, they are very quite compared to the 4988 drivers.
Anyway again well done.
Steve
I will upgrade mine. I didn’t think about the end of the mounting pole touching the roof and increasing the noise significantly. I will order some TMC drivers. They are more silent and should cause less interference.
How did you calibrate your rotor? Just a compass and a level?
Sam
For calibration, yes compass and a level.
I have a small bubble level and used a compass app on my phone.
It’s not perfect but good enough
Steve
Okay, I have it all set up, but it always dies on me. I get “AZ = -360°, EL = 0°” and then “ERROR”. I just replaced the Azimuth-end stop for the third time, because the rotor always tears it off when it goes beyond 340°. Any ideas?
Sam
Hi Sam,
I had forgotten about the end stop problems, Mine did the same initially on both axis I think what I did was carefully bend the arm on the switch to suit (trail and error).
I thought it was just the cheap switches I had purchased, Quality ones I purchased later didn’t have the problem.
As for the errors check settings in Gpredict etc.
Probably need more information on your exact setup.
What type of computer, if any. What’s giving the error. Hows it all connected.
Each case can be slightly different.
Have you tried connecting via USB before adding power to the cnc shield.
The list goes on.
Hang in there, it will work.
Steve