After messing around with an IP camera with OpenIPC for a bit, I decided to upgrade to a Pi HQ camera.
For now, this is running @cgbsat’s stvid software. But maybe soon it will run SatNOGS Optical instead? I’m holding out for a standalone/dockerized installation for now.
Hardware
We still had a Pi 5 8GB and a 6–60mm varifocal f/1.6 lens, so that’s what I used.
For the housing, I went with a 110mm drainage pipe (this one, except they only had the HT version, and these covers) and drilled holes for cable glands + the view opening (which I closed with some plexiglass + epoxy). I then 3D printed some parts for mounting inside the pipe, as well as a clamshell clamp with a 1/4’’ thread insert so I can mount it on a camera mount.
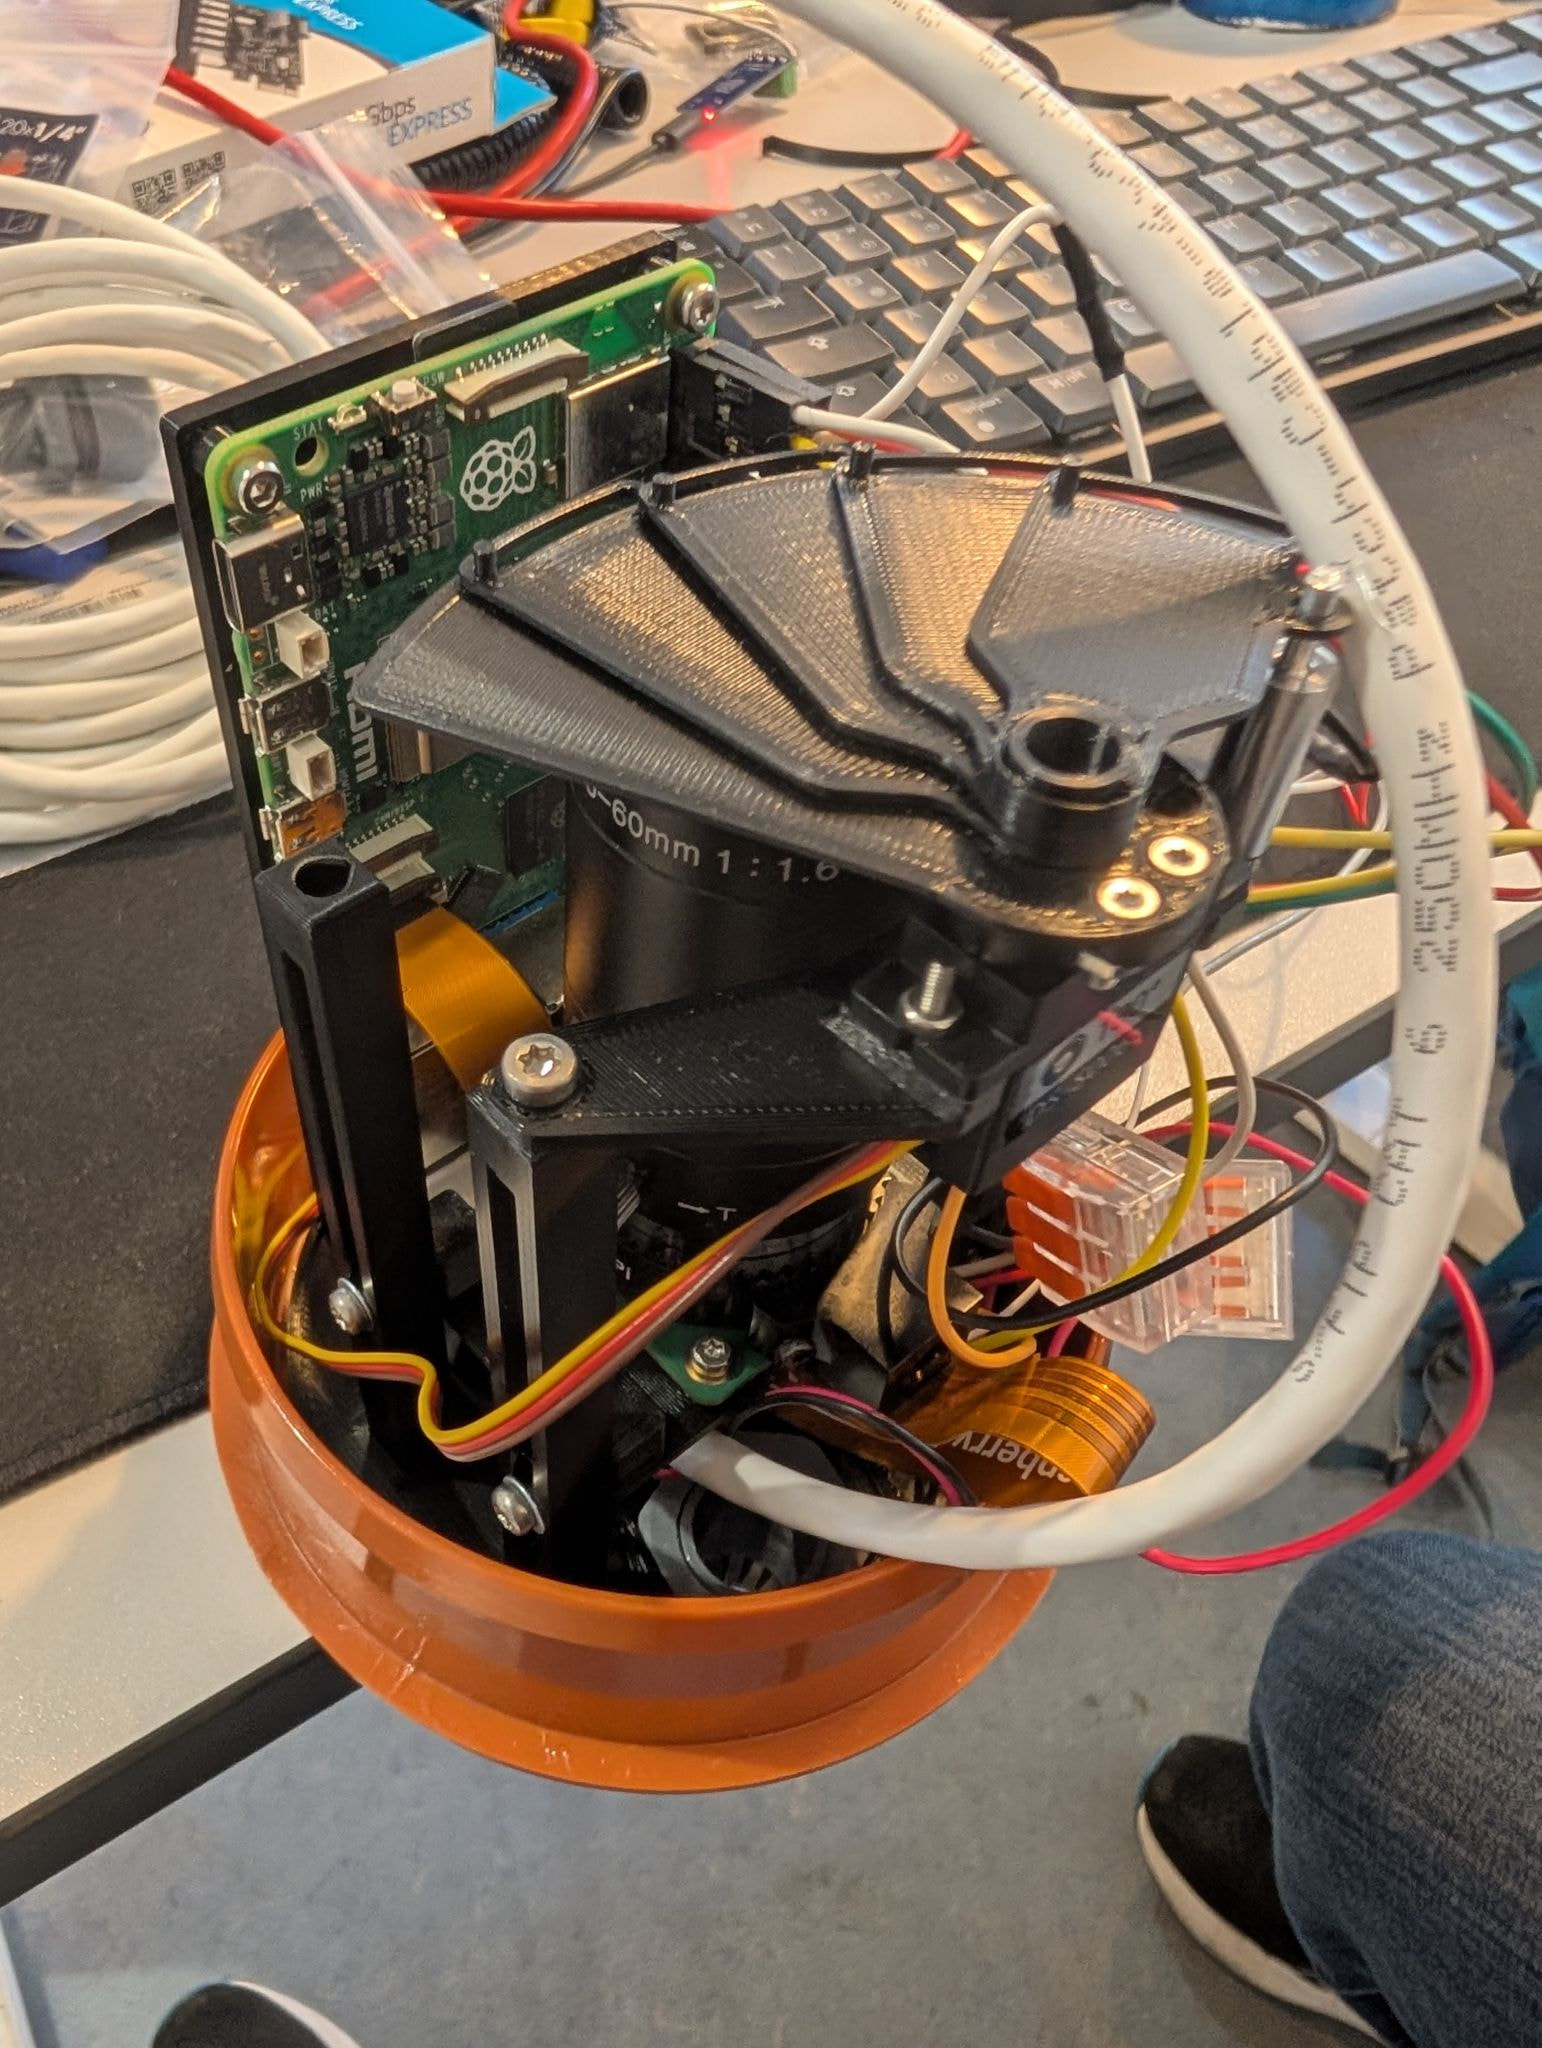
I also added a small servo + shutter, a 12V → 5V DC/DC for the power supply, a 12V fan, and a little AHT20 breakout board for temperature/humidity measurements.
This is what the hardware stack looks like (notice how you can’t see the fan at all? I’m sure that’s great for airflow):
And this is what it looks like fully assembled:
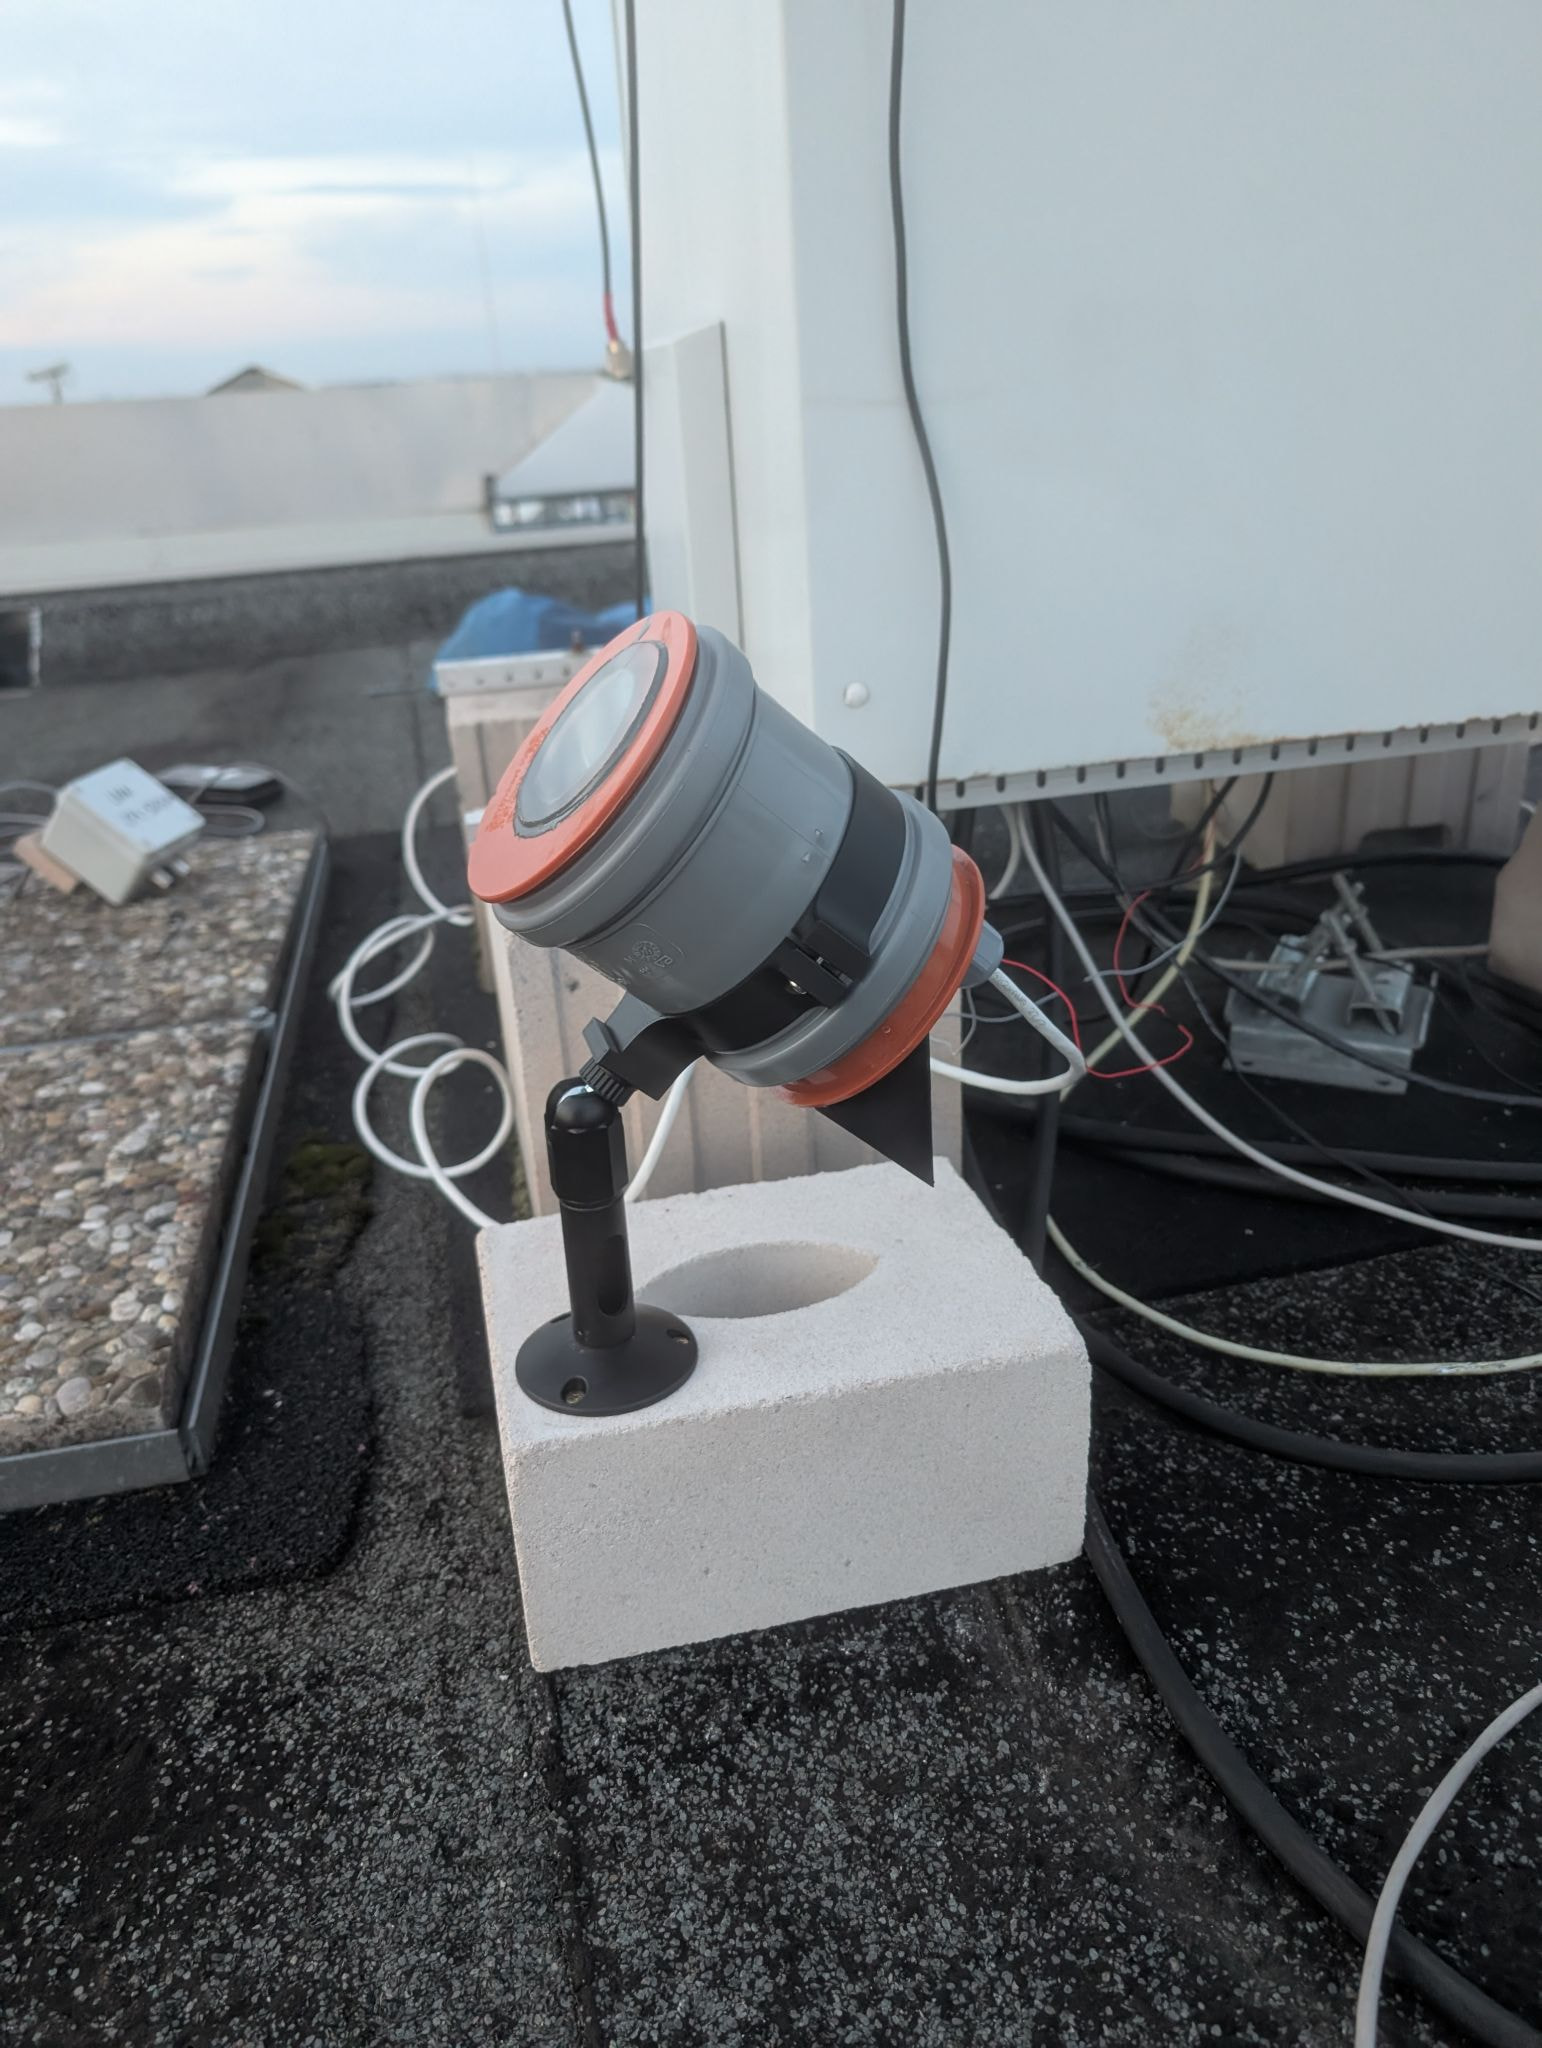
Like I said, I wouldn’t recommend using this housing. But if you do want to for some reason, here’s the CAD.
Software
I went with Ubuntu 26.04 Server. I didn’t take notes during setup, so the following is reconstructed from my bash history and might be missing some steps.
System dependencies
I don’t think all of these are necessary for stvid, some were required for other experiments. But it shouldn’t hurt to install them either way.
sudo apt install rpicam-apps-core \
  git make g++ libeigen3-dev source-extractor astrometry.net \
  python-is-python3 python3-pip python3.14-venv python3-libcamera python3-picamera2 \
  libcap-dev libpython3-dev libopenh264-dev libgl1
sudo cp /usr/bin/source-extractor /usr/local/bin/sextractor
Local dependencies
mkdir -p ~/software && cd ~/software
git clone https://gitlab.com/pierros/hough3d-code.git
git clone https://github.com/cbassa/satpredict.git
cd ~/software/hough3d-code
make -j4
sudo cp hough3dlines /usr/local/bin
cd ~/software/satpredict
make -j4
sudo make install
Installing stvid
@pe2bz noted in his stvid setup post that the original cbassa/stvid does not work on a Pi 5. @EelkeVisser created a branch with picamera2 support. It’s a bit older, so I merged cbassa/main into EelkeVisser/picamera2. It turned out that stvid was selecting the 10-bit mode on the HQ camera (maybe because I was using a different OS?), so I added one more commit to select 12-bit mode. The result is now in jazzpi/picamera2, so we can install it like this:
cd ~/software
git clone https://github.com/jazzpi/stvid -b picamera2
cd ~/software/stvid
python -m venv --system-site-packages .venv
source .venv/bin/activate
pip install -r requirements.txt
NOTE: We install the Python requirements into a virtual environment. That means, before running any of the stvid scripts, we always have to activate the virtual environment (cd ~/software/stvid && source .venv/bin/activate). It’s also very important to create the virtual environment with --system-site-packages. Otherwise, you have to build python3-libcamera and python3-picamera2 locally, and that is not fun.
System configuration
There’s a couple more steps before acquire.py can run:
Access rights
We need to give our user access rights to the camera + DMA:
sudo usermod -aG video $USER
CMA pool size
I ran into Cannot allocate memory errors because the CMA pool was too small. So we need to increase the pool size.
First, I added cma=512M to /boot/firmware/cmdline.txt and rebooted, but this didn’t seem to have any effect. So I also edited /boot/firmware/config.txt and edited the dtoverlay=vc4-kms-v3d line (in the [all] section) to say
dtoverlay=vc4-kms-v3d,cma-512
and rebooted. Afterwards the pool size was finally increased:
$ grep -i cma /proc/meminfo
CmaTotal:         524288 kB
CmaFree:          137288 kB
So maybe you can skip the cmdline.txt edit but it doesn’t seem to hurt.
NAS mount
I have a 64GB SD card, so that could probably store quite a few observations. But I don’t want to wear it out. Since the Pi is connected to Gigabit ethernet, I decided to store the observations on a SMB share. That has the added benefit that I can easily process them from a (more powerful) VM rather than having to run everything on the Pi.
So, we need to edit /etc/fstab to add the SMB mount:
//10.1.2.3/visual-sat-tracking /mnt cifs defaults,uid=1000,gid=1000 0 0
Afterwards, run sudo mount -a && sudo systemctl daemon-reload to make the system pick up the new mount.
stvid configuration
I put the configuration on the NAS so I can share it between the acquire.py Pi and the process.py VM. Without the NAS you can skip this of course.
cd ~/software/stvid
mkdir -p /mnt/stvid
cp configuration.ini-dist /mnt/stvid/configuration.ini
ln -s /mnt/stvid/configuration.ini
Then, edit it in your favorite editor and modify the following values:
[Observer]→ everything. For COSPAR, if you don’t have an ID, it’s recommended to pick a number between 9900 and 9999.[Setup]camera_type = PIobservations_path = /mnt/stvid/obs(or whereever you want to store them)
[Credentials]→ your space-track.org username/password, used for theupdate_tle.pyscript[PI]exposureshould matchframerateso you get as much light as possiblenframes/framerategives you the length of time for each.fitsstack. It’s recommended to set this so the fastest possible satellite will not enter & exit the FOV within one stack. I just went with 10s stacks for starters.analog_gaingoes up to 22.26, afterwards the camera starts compensating with digital gain which won’t help. I believedigital_gainis not used at all.- I have the following configuration (which I’m still testing, there might be better configurations):
[PI]
device_id = 0           # Device ID
nx =  800               # Camera horizontal pixel count
ny =  600               # Camera vertical pixel count
nframes = 100           # Number of frames for each image
framerate = 10		# Take 10 frames per second
exposure = 100000	# Exposure time in us
awb_gain_red = 2	# Gain for red.
awb_gain_blue = 2.3	# Gain for blue
analog_gain = 23	# Analog gain
digital_gain = 1	# Digital gain
[Elements]→tlepath: I set it to/home/$USER/tle- I commented out
[Shutter]and[Aimpoint]because I wasn’t sure how they would affect my setup
Observing
Turning the rings
Before closing up the housing (in my case, before pushing the camera into the housing at all), we need to configure the lens. Aperture ring goes wide open, of course.
For the zoom ring, the #satnogs-optical consensus seemed to be that zooming all the way in (60mm) would lead to a too narrow FOV. So I zoomed out a little bit. Turns out I went to ~35mm (we will see this in the results).
Now the focus ring: for this, I ran
rpicam-vid -t 0 --codec mjpeg --listen -o tcp://0.0.0.0:8888 --framerate 25
on the Pi, and ffplay tcp://10.3.2.1:8888 on a laptop that I had with me. Then I pointed the camera at some distant buildings and turned the focus ring until it looked decently focused. Maybe it would be better to do this at night and focus on the stars directly, but I didn’t want to stay on the roof until nighttime.
Unfortunately, the video stream had quite a bit of delay (I think 5–10s) which made adjusting the focus very painful. Ben’s post has instructions for getting VNC running, that might provide a video stream with less delay…
Pointing the camera
After closing up the housing, the question is: where should the camera look? As per Ben’s recommendation, I tried to aim for AZ west and EL 50°. IIUC this should be a good pointing because there’s lots of satellites (Starlinks) in an ~53° inclination, which should pass roughly west-to-east over Berlin (which is at ~52.5°N). We will see how well I pointed it in the results.
Starting the observation
Now it is just a matter of starting the observation. For a quick test (even at daytime) you can run
cd ~/software/stvid
source .venv/bin/activate
./acquire.py -t 120
which will immediately start acquiring for 120s. So with the 10s stacks, you should see 12 .fits files coming out of this. You can inspect the .fits with AstroImageJ for example (on Wayland, I had to run export _JAVA_AWT_WM_NONREPARENTING=1 before starting it to make it behave correctly).
Once you’re happy with your configuration, you can just run
cd ~/software/stvid
source .venv/bin/activate
./acquire.py
and it will wait until dusk before starting the acquisition, then stop acquisition and exit at dawn. So you have to restart it every day. Probably I will set up a cronjob/timer for this, but for now I’m just running it manually.
Results
I’ve had it running for two (partial) nights now. Unfortunately it’s been pretty cloudy (and the middle of a big city isn’t ideal wrt. light pollution), but still I caught a bunch of Starlinks and some other satellites 
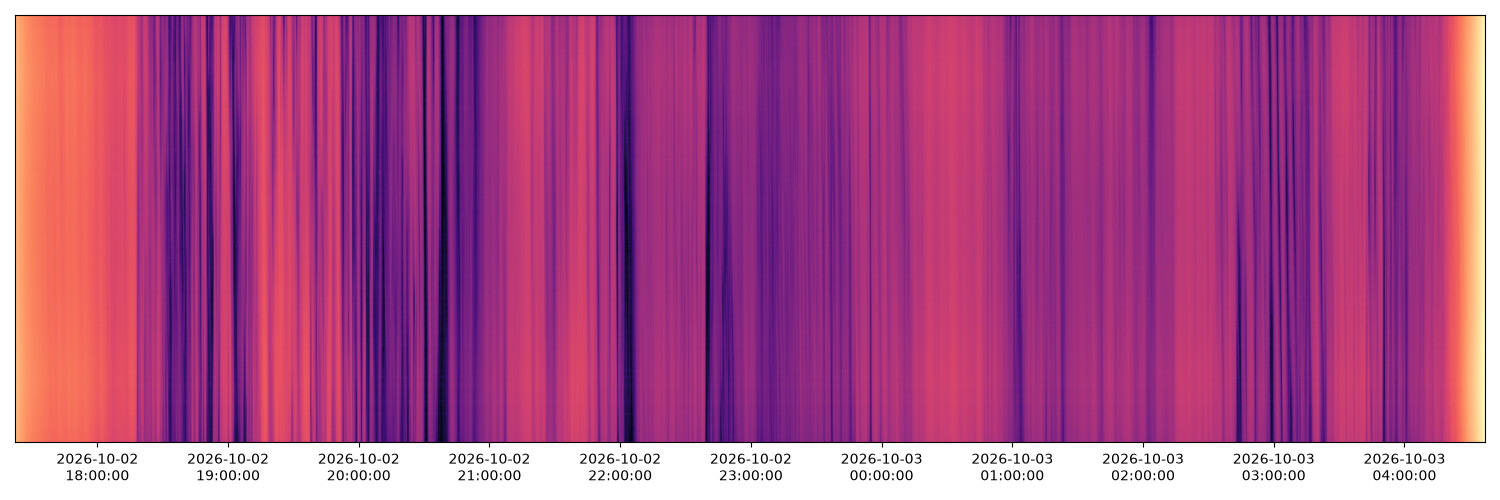
Keograms
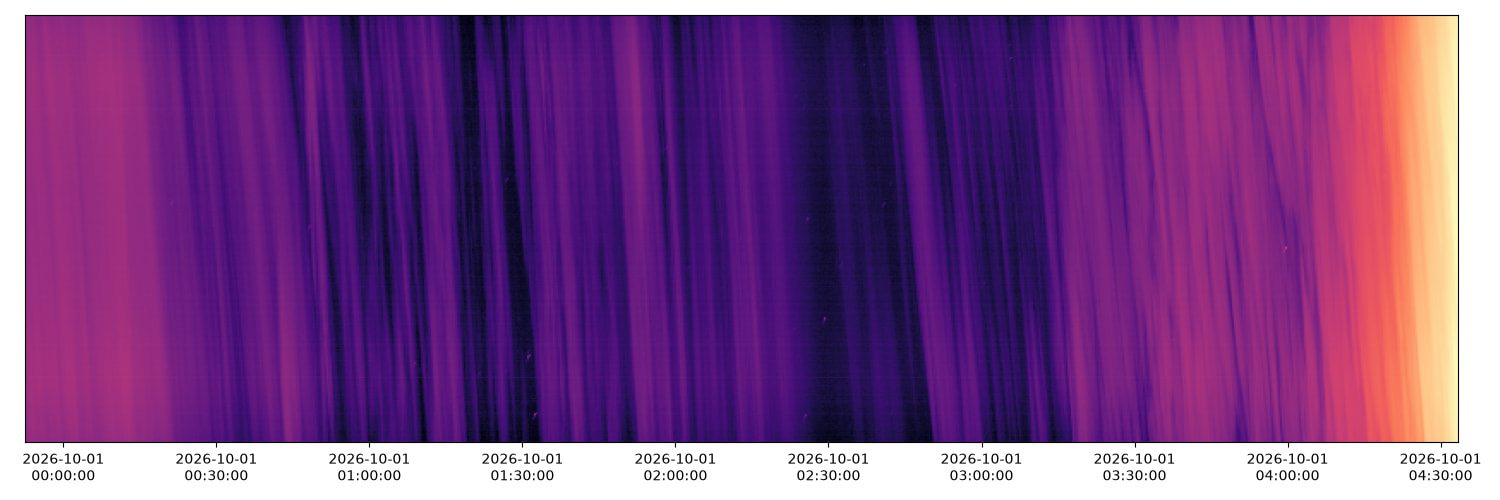
(took me until ~01:30 local to set up stvid…)

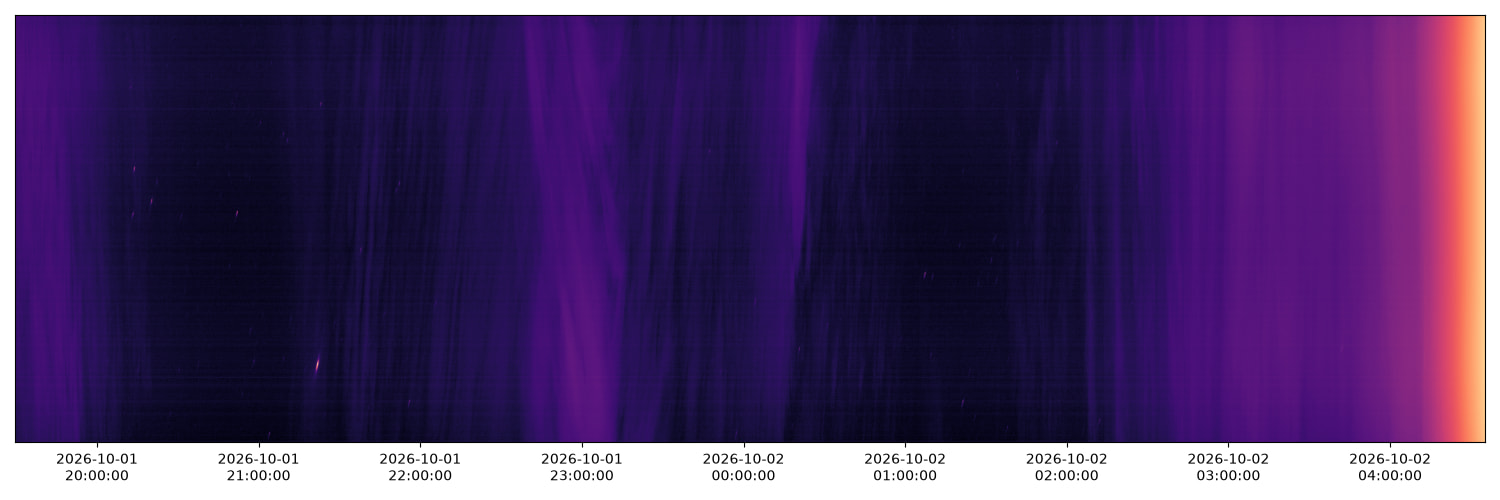
(~21:15 local I discovered the camera was in 10-bit mode, after fixing it I restarted
acquire.py so there’s two keograms for the second night)
Numbers
- Night of 09-30 to 10-01:
- 14 ID’d tracks
- 9 ID’d satellites
- 3x rocket body
- 2x spy satellite
- 2x communications satellite (no Starlinks!)
- 2x science satellite
- 2 unID’d tracks (after cleaning up junk)
- all tracks (ID’d and unID’d) between 02:42 and 03:15 UTC
- Night of 10-01 to 10-02:
- 54 ID’d tracks
- 28 ID’d satellites
- 4x rocket body
- 1x geodetic satellite
- 16x communications satellite (15x Starlink)
- 3x science satellite
- 1x meteorology satellite
- 2x SAR satellite
- 17 unID’d tracks (after cleaning up junk)
- all tracks (ID’d and unID’d) between 18:02 and 21:07 UTC
- Night of 10-02 to 10-03:
- 12 ID’d tracks
- 8 ID’d satellites
- 1x rocket body
- 6x communications satellite (5x Starlink, 1x BlueBird)
- 1x SAR satellite
- 3 unID’d tracks (after cleaning up junk)
- all of them seem to be Starlinks
- all tracks (ID’d and unID’d) between 18:33 and 20:11 UTC
The first night I had stvid configured for 5fps/200ms exposures at 100 nframes, so each stack was 20s long.
The first night I only started acquisition long after dusk, and the second night I think there were too many clouds during dawn. So that probably explains the different timeframes of the detected tracks.
Highlights
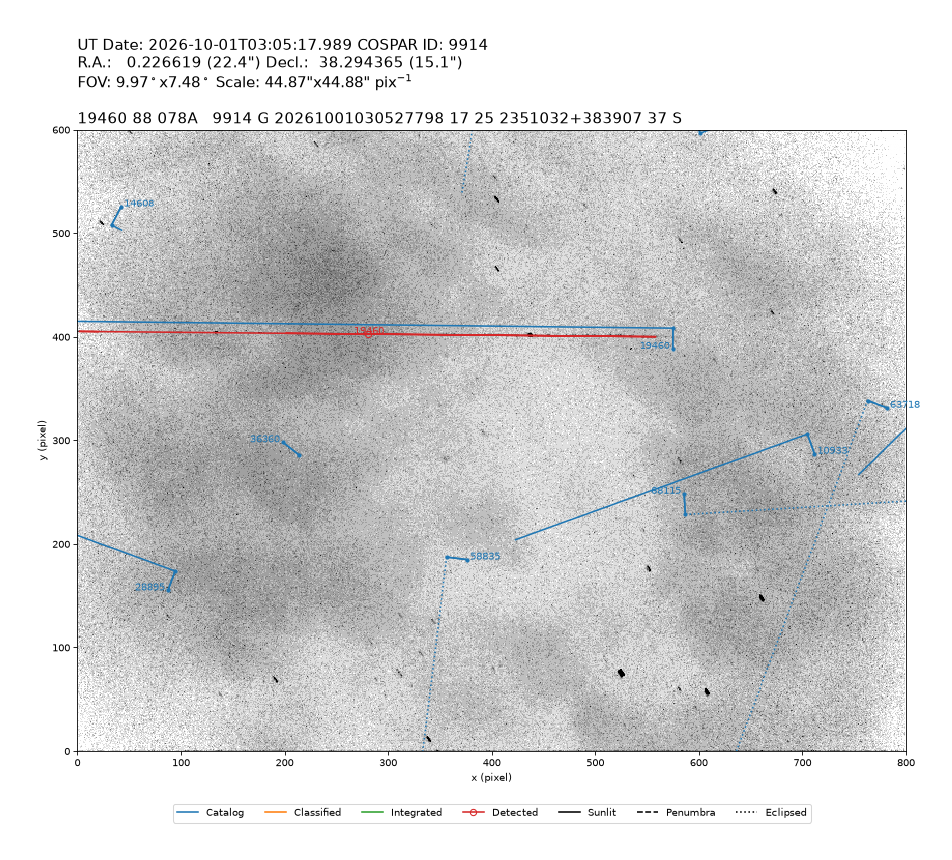
19460 USA 32, a late cold-war era SIGINT satellite which recently made the news because it experienced a fragmentation event (of course I don’t think there’s any fragments visible with this setup):
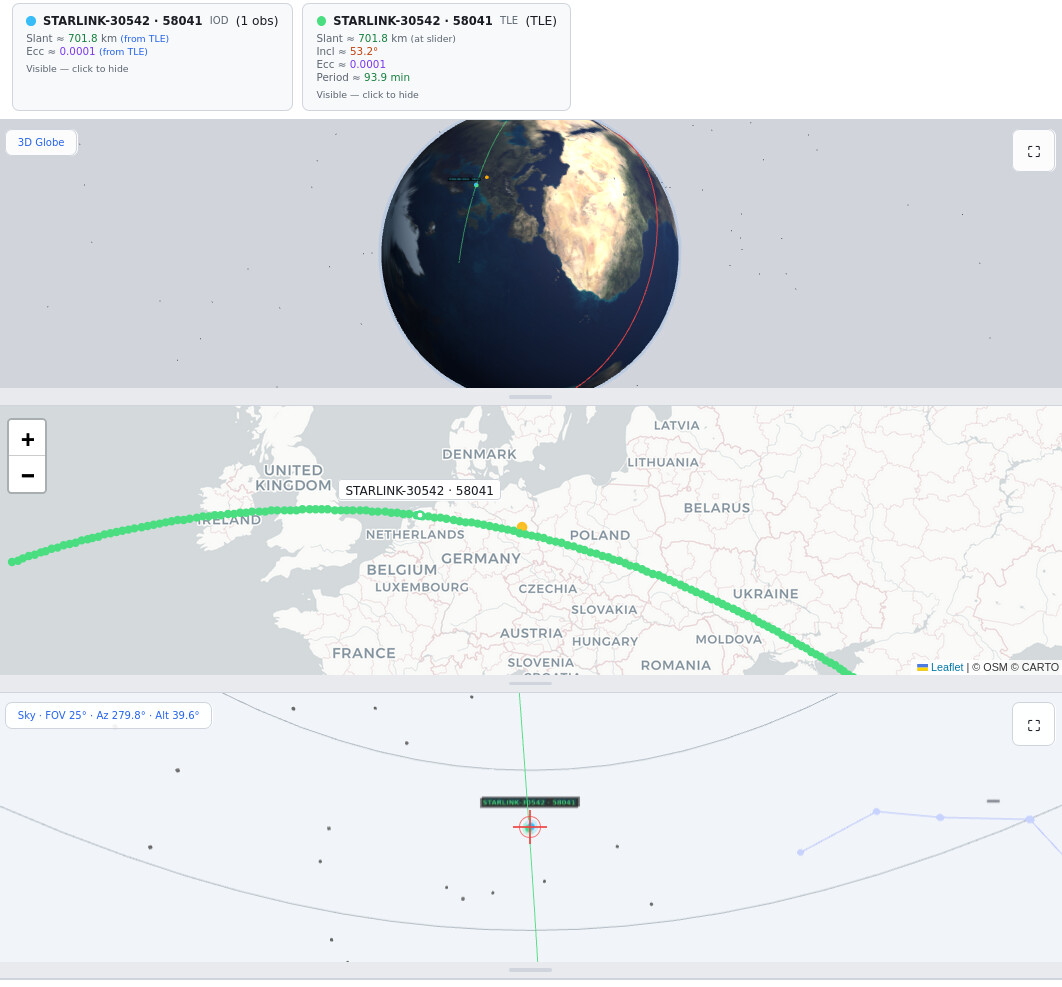
Two Starlinks at once:
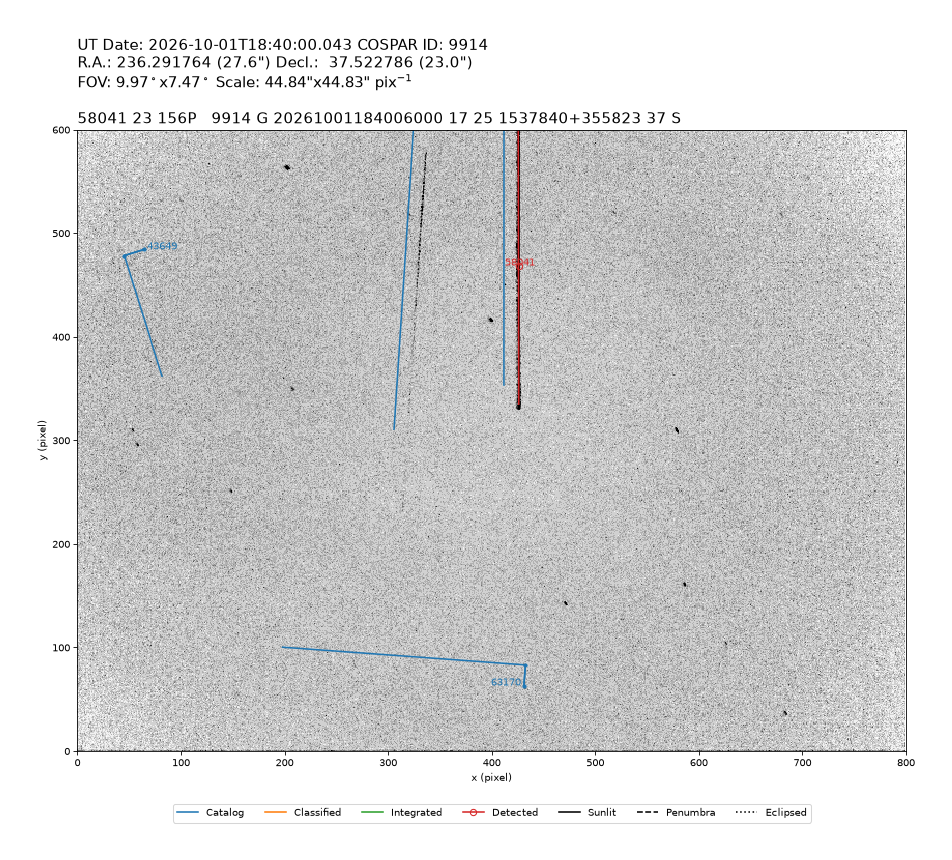
(for some reason stvid did not ID the left track, but it’s 52464 Starlink-3904 and 58041 Starlink-30542).
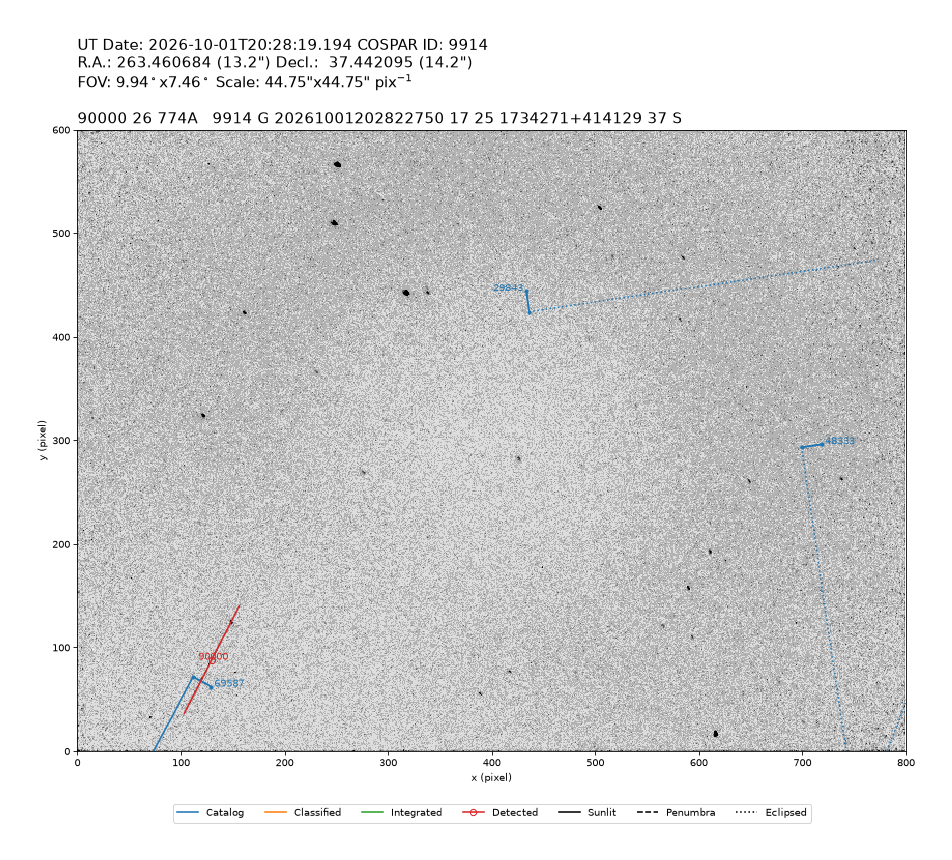
unID trailing just behind 69587 OBJECT F:
and if you check the GP history:
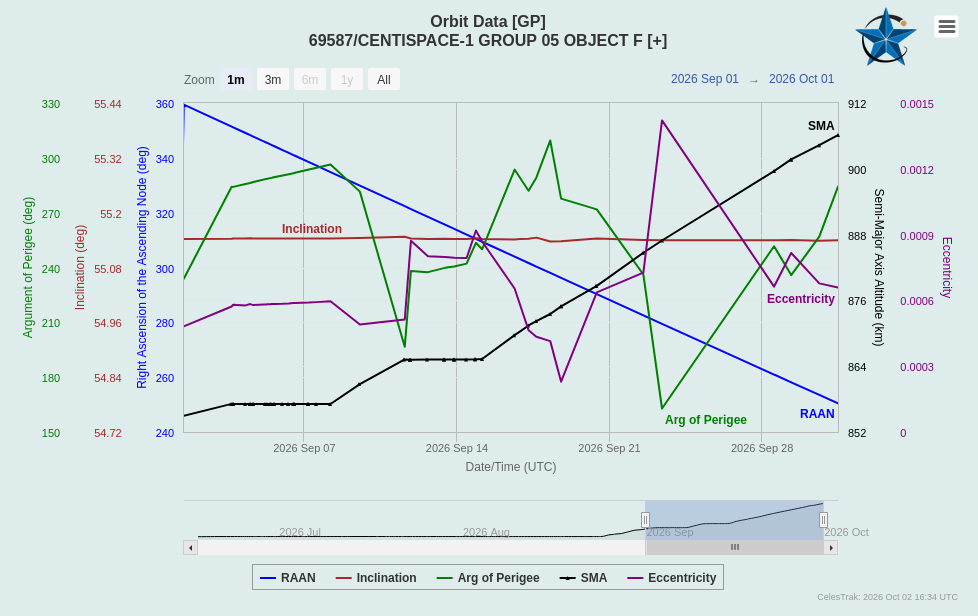
69587 is in the process of raising its orbit. Since that means a longer period, you would expect it to trail behind the predicted position
Of course that doesn’t mean the track is actually of 69587, could just be a coincidence. Next step is figuring out how to do that analysis… Maybe I can generate a TLE from the IOD and see if it lines up with the next Space-Track TLE?
Pointing analysis
stvid helpfully puts RA/Dec and FOV in each image (from its astrometry solve). Let’s take the 69587 one as an example.
If we plug the RA, Dec, time, and Berlin’s coordinates (52.52°N/13.41°E/50m) into this calculator, we get Az 280.0°, Alt 41.8°. So my eyeballed pointing was off by ~10° in both azimuth and elevation.
From the FOV + sensor size, we can also calculate the focal length of the lens:
tan(a/2) = (H/2)/f
f = H/(2 tan(a/2))
where a = FOV, H = sensor size, and f = focal length.
stvid reports a FOV of 9.94° x 7.46°, so a diagonal FOV of
sqrt(9.94² + 7.46²) = 12.43°
The Pi HQ camera uses an IMX477 sensor, which has a diagonal of 7.857mm. So we get
f = 7.857mm/(2 tan(12.43°/2))
f = 36.07mm