Tutorial: Setup GPSD and PPS for Satnogs Station Discipline Clock - Getting the time directly from the Satellites

who need this tutorial: everyone that want an accurate clock on their system in nano second accuracy, more accurate comparing clock from internet - NTP (milisecond)

i run this tutorial on raspberry pi, but it should be work for any linux distro and pc.

first time hear gpsdo term (not direct related, because what i do is discipline for local clock, not related with oscilator hardware for sdr) from @pe0sat post . first time know about Pulse Per Second (PPS) from @pierros satnogs optical

then yesterday im searching on youtube and found this and that videos

based on both videos i setup my gpsd and pps clock.

i use raspberry pi 4

for gpio scheme check here

the main hardware in this tutorial is gps module.

i use neo-7m gps module
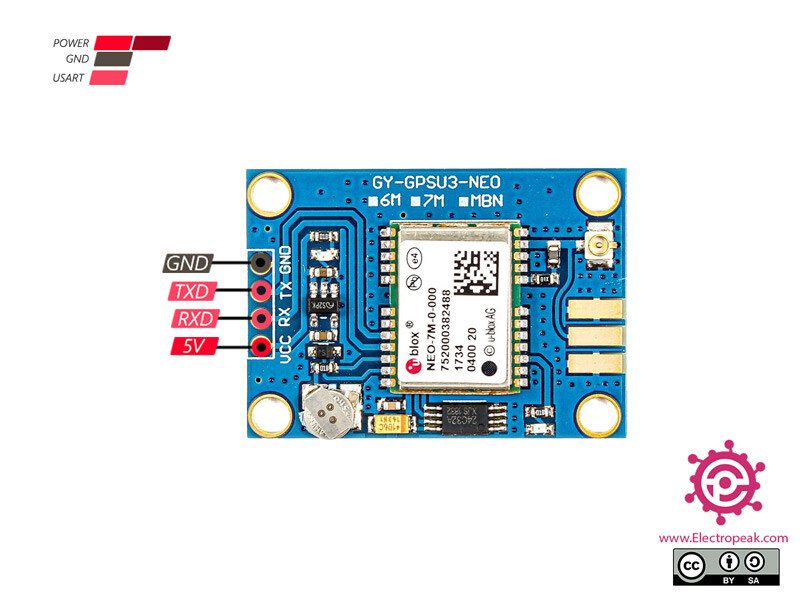
as you can see this module dont have pps pin. (only gnd, txd, rxd, and vcc 5v). but dont worry, searching on internet, you can get the pps pin with just soldering a wire to pin number 3 of the gps chip, or just before the led. here i zoom out:
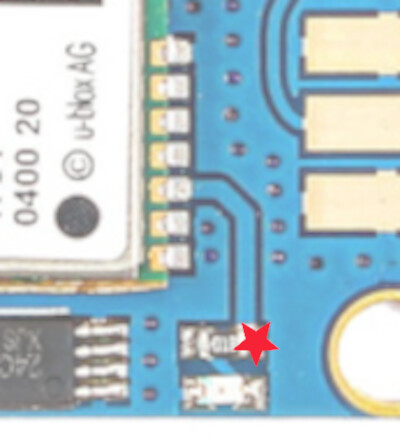
if you have the gps module that complete with pps pin, that will better and make your life easier.

okay before connect the module to your raspberry pi,
run this command first

install the software
sudo apt install screen gpsd pps-tools

enable serial

sudo raspi-config
select interface
select serial
   **the serial login shell is disabled**
   **the serial interface is enabled**

add your raspberry pi user to dialout group:
sudo usermod -aG dialout your_username

sudo systemctl stop serial-getty@ttyAMA0.service 
sudo systemctl disable serial-getty@ttyAMA0.service

enable PPS :
nano /etc/modules
put this line:
pps-gpio

nano /boot/firmware/config.txt
put this line

# enable PPS on GPIO18
dtoverlay=pps-gpio,gpiopin=18

restart your raspberry

now connect the gps module to your raspberry pi pin.

look this diagram

we only need this:
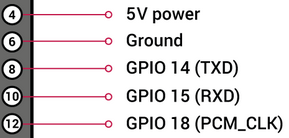
gnd on module to ground on raspi (6)
vcc on module to 5v power on raspi (4)
txd on module to rxd on raspi (10)
rxd on module to txd on raspi (8)
pps on module to pcm_clk on raspi (12)

you will see the led power is on.
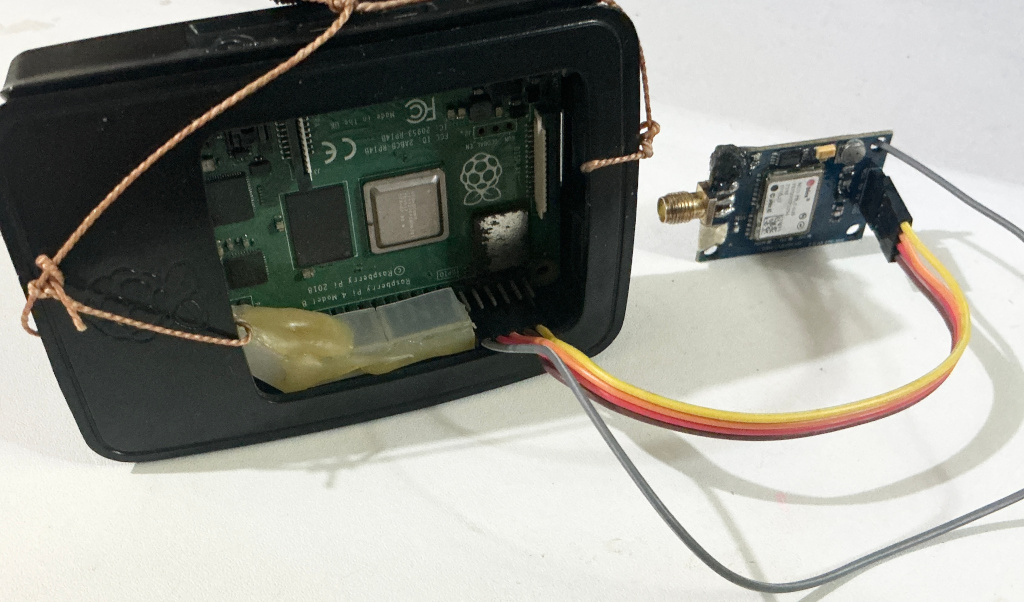
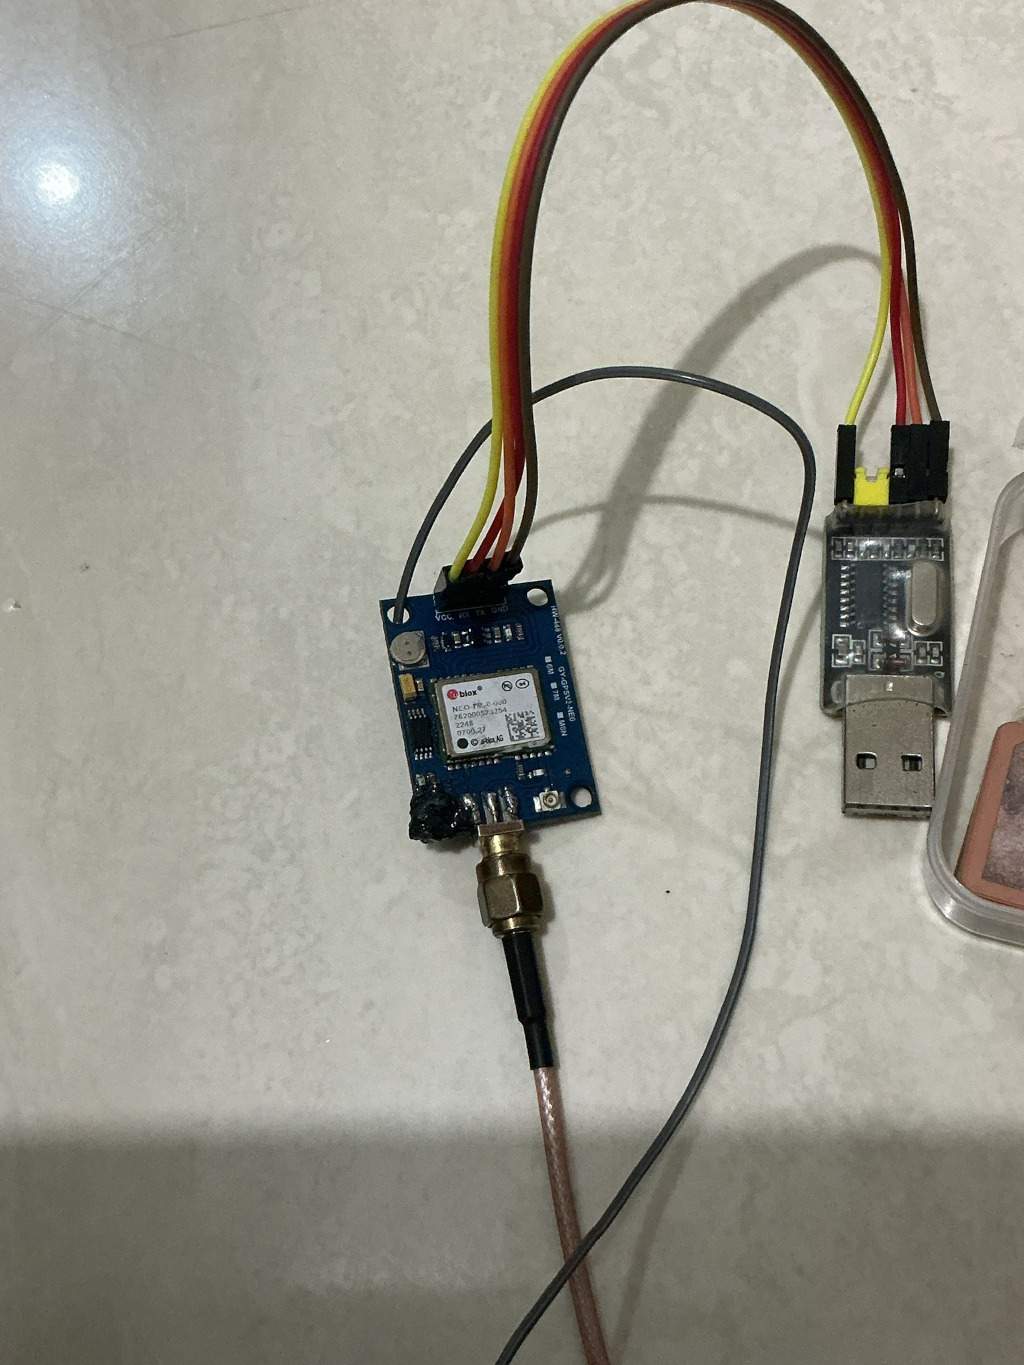
i modify the gps antenna , change the ufl connector to rp-sma connector, then extend with coaxial cable around 3 metre, so i can put it on outside. i put the antenna on used plastic box. on gps module i also add and soldering the rp-sma connector, that i take and desolder from other board (broken lna board).

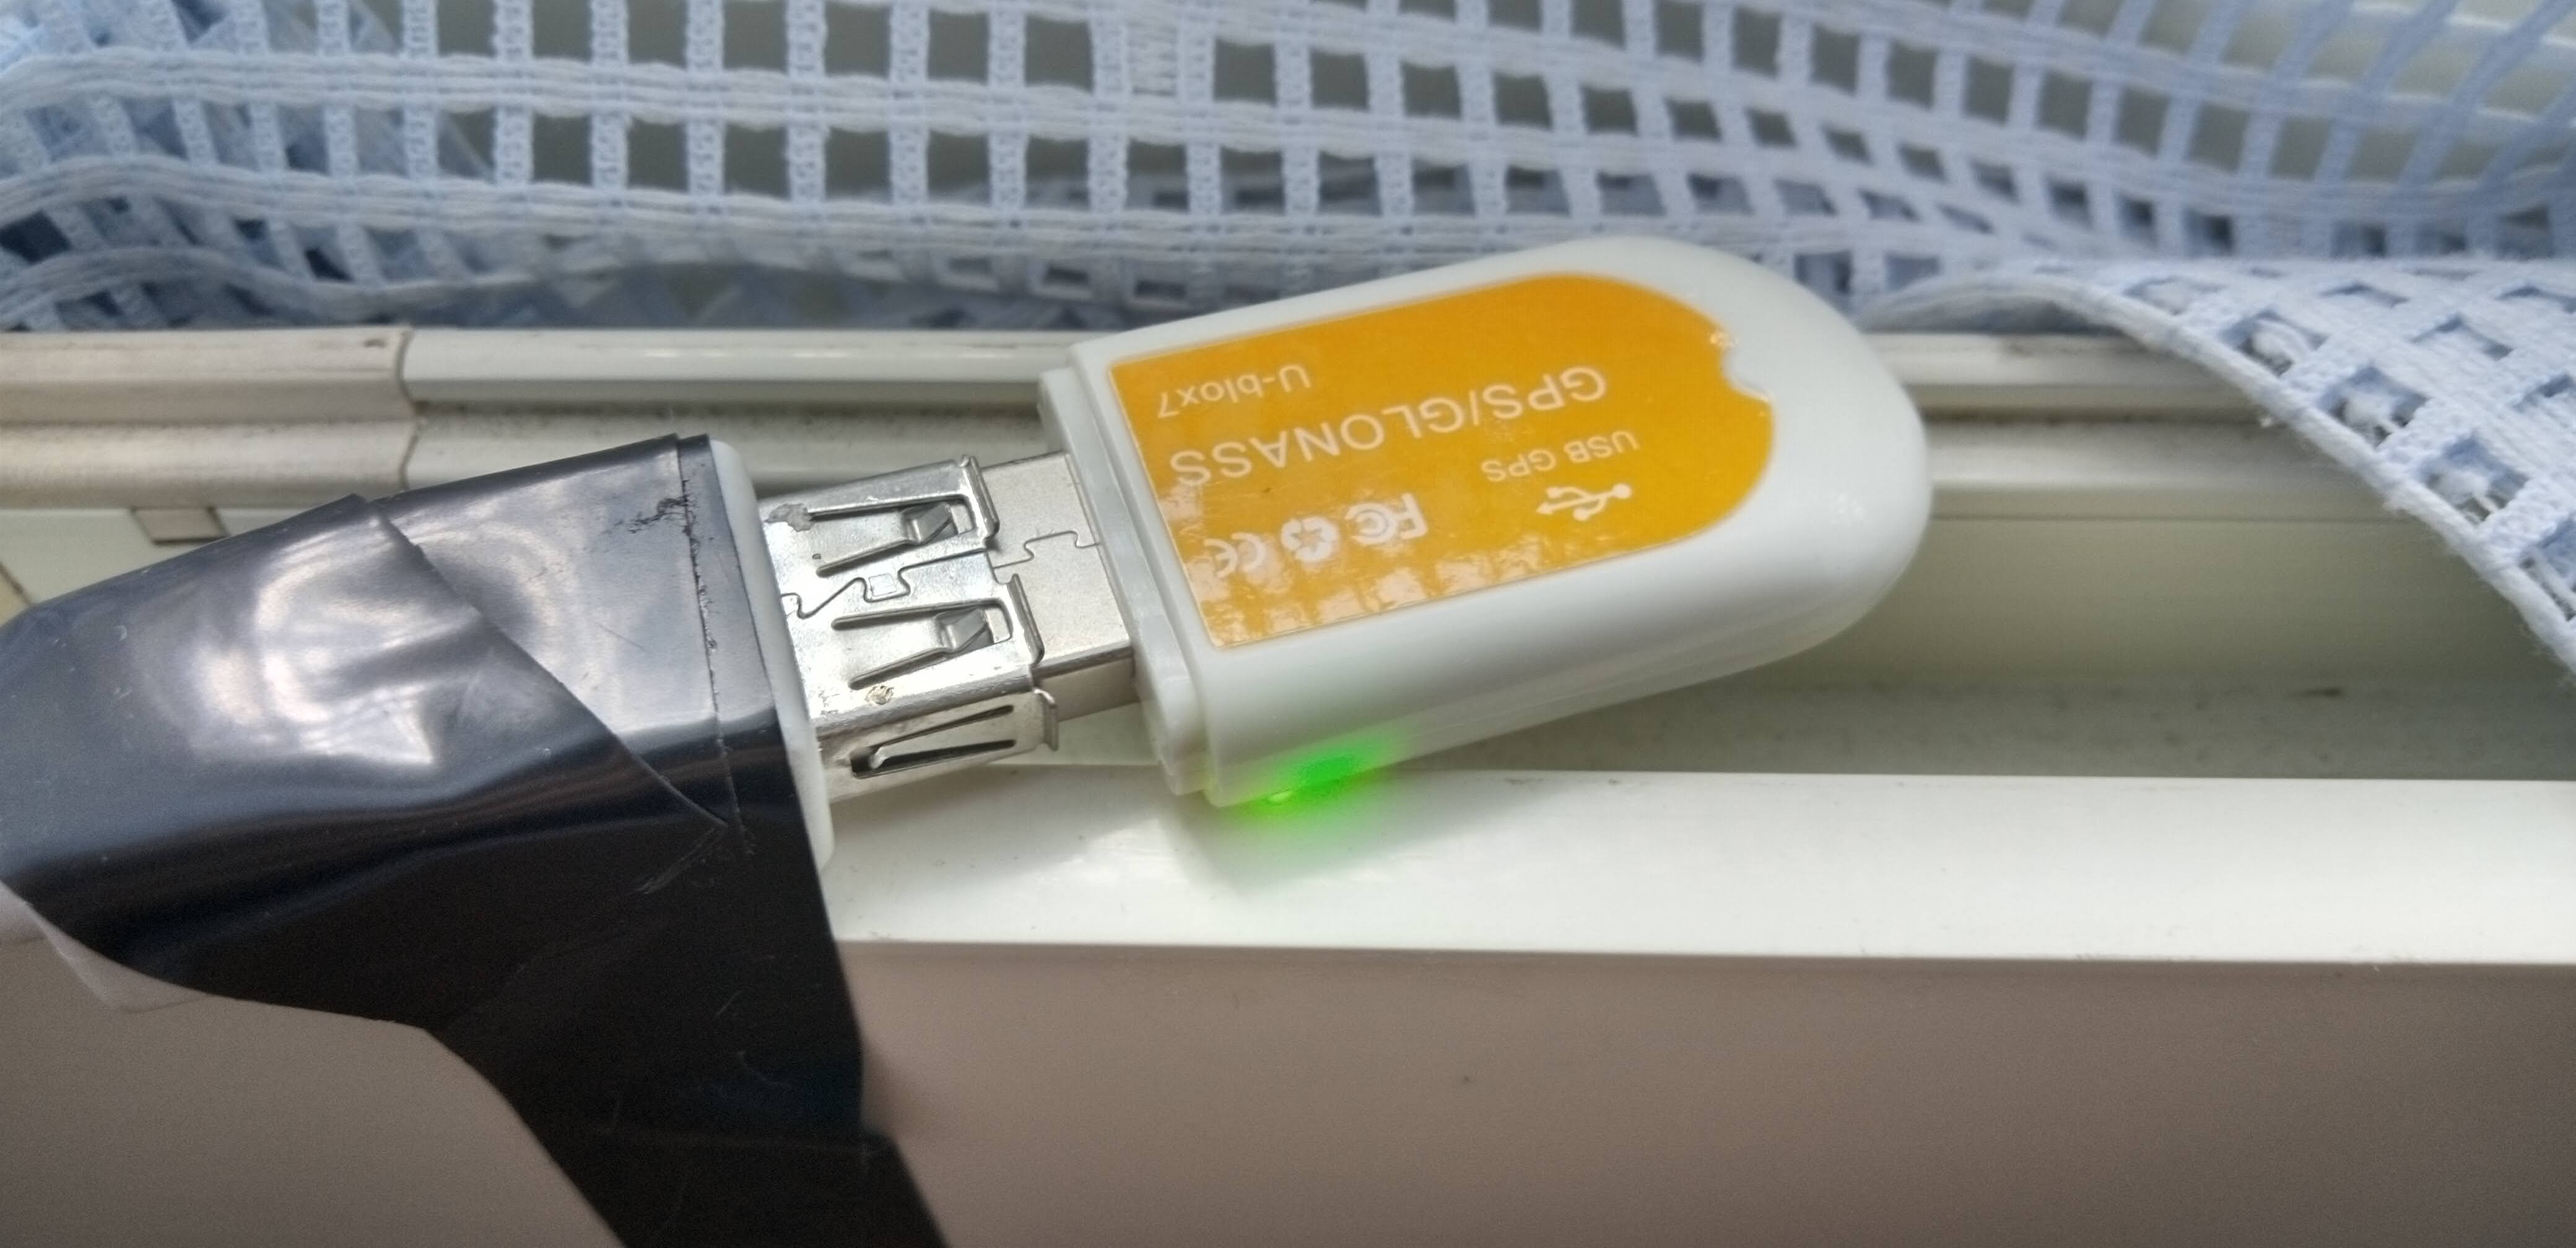
if you see the usb on central and right picture, dont be confused. that is what i use just to test it on pc , the usb is usb ttl (usb to serial). you dont need it on raspberry.

the gray cable is pps wire.

detect the gps:
sudo gpsctl -n -f /dev/serial0
output:
/dev/serial0 identified as a u-blox SW 7.03 (42969),HW 00040007 at 9600 baud

now check if gps module work, just type this command:

sudo cat /dev/serial0
or
screen /dev/serial0 9600
or
sudo gpsmon /dev/serial0

and you will see running text like
$GPRMC,...$GPGGA,...

that we called NMEA serial message

now test the PPS
sudo ppstest /dev/pps0
you will see response like this:

ok, found 1 source(s), now start fetching data...
source 0 - assert xxxx, sequence: xxxx - clear  0.000000000, sequence: 0

now setup the clock

sudo nano /etc/default/gpsd
change:

DEVICES="/dev/serial0 /dev/pps0"
USBAUTO="false"
GPSD_OPTIONS="-n"

GPSD_OPTIONS=“-n” tells gpsd to start reading from the GPS device immediately, even when no client program such cgps or gpsmon is connected.

run the gpsd services:

sudo systemctl enable gpsd
sudo systemctl start gpsd

install main software, chrony. this app will replace the old clock system.
sudo apt install chrony

sudo nano /etc/chrony/chrony.conf
give comment on ntp line like this one

# Use Debian vendor zone.
# pool 2.debian.pool.ntp.org iburst

add or update with this line

makestep 0.1 -1
initstepslew 1.0 GPS
refclock SHM 0 delay 0.2 refid GPS poll 4 noselect
refclock PPS /dev/pps0 refid PPS lock GPS poll 4 prefer

this setup will force raspberry to only get the clock from PPS.

restart the chrony
sudo systemctl restart chrony

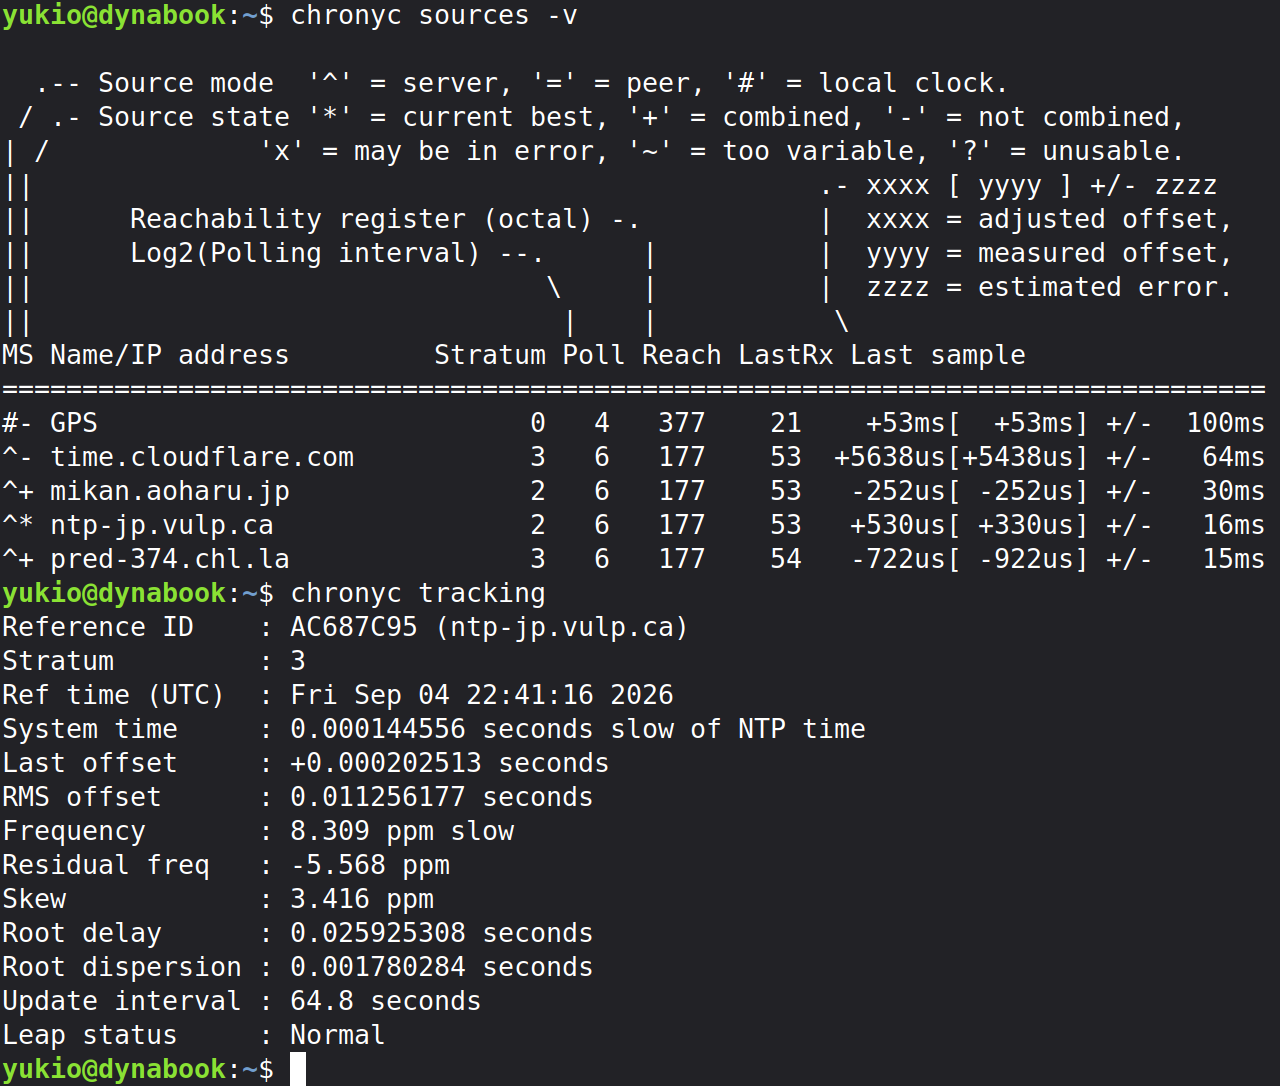
check the crony :

chronyc sources -v
chronyc tracking

finish!!

troubleshot:
to make the gps module get signal and data from gps satellite, it ussualy take some minutes. on my case ussualy around 5 to 10 minutes. you can see if it got the satellite, the pps led will blink on. (green light on my device).

or you can just run this command to check
cgps -s

if until 30 minutes you dont get the gps signal, make sure :
your gps antenna is connected
the antenna facing to up
put the antenna minimum beside window that can see the sky
make sure the antenna is not broken. in my case the cable inside antena is disconnected. what i do is open the metal case of antenna and soldering back. you can check with your avometer to check if the antenna is not broken.
6 Likes

Hi BALI,

Thanks for sharing this wonderful tutorial!

Inspired by your guide, I set up a time sync system on my Linux laptop (dynabook) using a USB GPS dongle. By configuring gpsd and chrony with SHM 0, I successfully integrated GPS time synchronization.

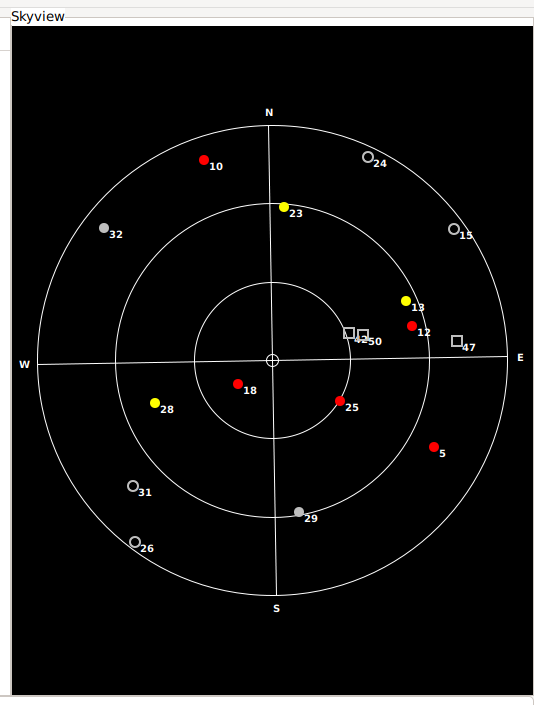
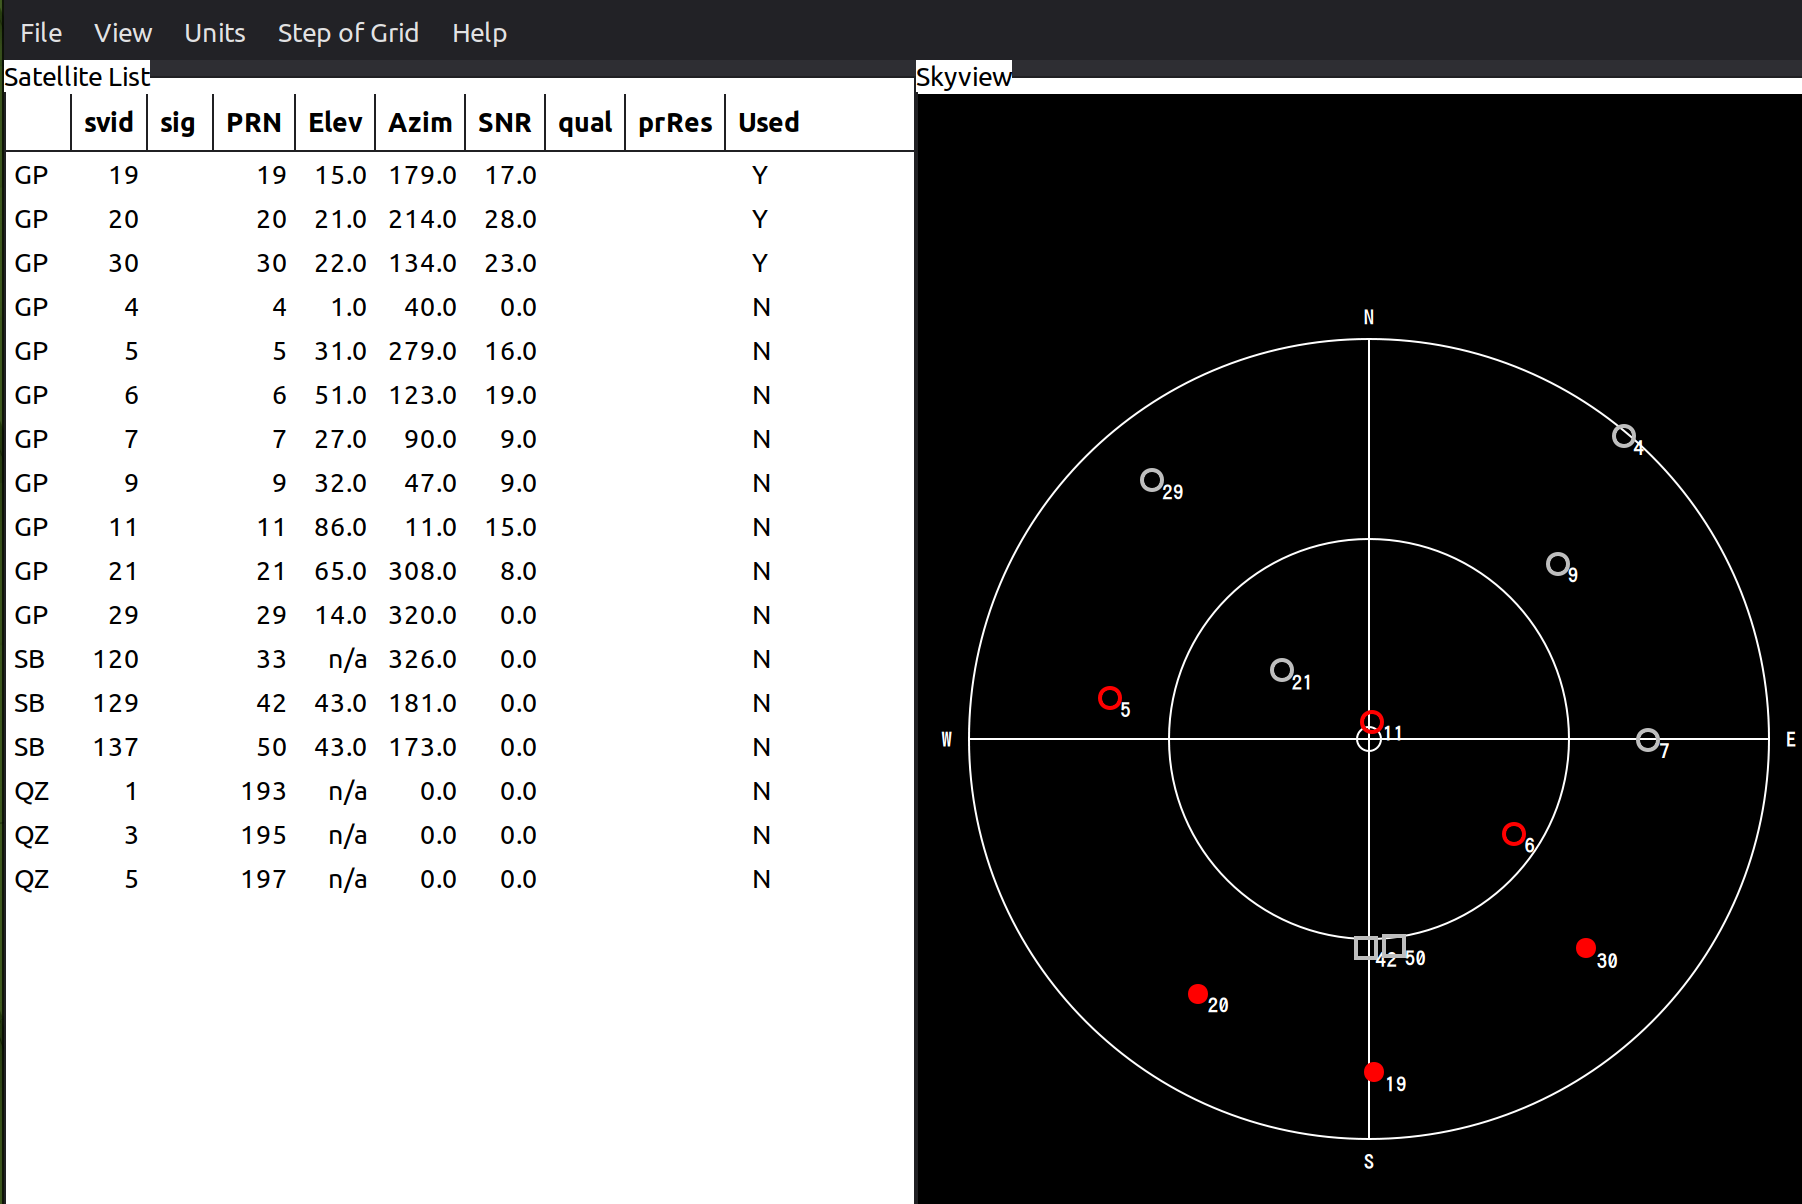
Attached is an xgps screenshot showing the current status. It’s successfully tracking multiple GPS, SBAS, and QZSS (Michibiki) satellites here in Japan.

While a direct hardware PPS connection (like on a Raspberry Pi GPIO) is ideal for ultimate nanosecond precision, my USB NMEA/SHM setup currently shows a stable reach with an offset of around +53ms in chrony, providing a very reliable reference.

Thanks again for the great inspiration!

73,

JP7DVX

1 Like

I run a local ntp server off GPS on my server box. I have a HP Z3805A I am working on setti g up as my GPSDO 10MHz standard and it also has the GPS time out and PPS, so going to be moving ti that once I have it working.

2 Likes

That HP Z3805A sounds like an amazing piece of hardware! Way beyond my simple USB setup, but I’m enjoying the journey. Good luck with your GPSDO project!

1 Like

Right now mine is a Uart GPS, with a PPS pin tired to the correct signalling pin for PPS input. Havent even powered on the HP unit yet. Really need to at some point to learn how to use it.

2 Likes

Haha, that makes us comrades in the trenches! Good to know we’re both in the middle of our own GPS adventures.

By the way, I love that UART + PPS setup. It’s so much more rewarding when we wire things up ourselves compared to just plugging in a black box.

Good luck getting that PPS signal locked in!

1 Like

Just a quick update on my GPS adventure with the Dynabook!

After sorting out a minor systemd conflict between gpsd.socket and gpsd.service (which was blocking port 2947 and freezing xgps), everything is now running smoothly.

Managed to get the USB u-blox GNSS dongle feeding clean data into gpsd, displaying all Satellites and QZSS (Michibiki) nicely in xgps, and tied it into chrony as a local reference clock. It’s fantastic seeing all the pieces come together.

Happy tracking, everyone!

1 Like

that cool device. that is professional / lab grade of gpsdo. your homework to set it up :smiley:

in term of SDR, what i know, gpsdo is used to keep the oscilator as frequency reference not drifting.
this drifting caused by temperature.

so because my RTL-SDR v4 doesnt have gpsdo input external, i just rely on RTL-SDR TCXO (Temperature-Compensated Crystal Oscillator) , that from their website have less than <1 ppm (part per million)

so for 433 MHz, the error / freq drift should be less than 433 Hz.

so to keep my sdr as accurate possible, what i do just try to cooling my RTL-SDR when work (running observation) , keep to always below 35 degree C. btw i stay on tropical country, with room temperature at day around 30-31 degree Celcius.

love this tools. thank for sharing. because my raspberry pi headless, i try connect to gpsd from other machine over lan network. and it work.

1 Like

I’m also running my Dynabook headlessly, so I peek at it from my main machine’s monitor too!

Just noticed… comparing your skyview and mine, the positions of the satellites look quite different! For instance, QZSS (Michibiki) is right down at the southern edge on my screen, but not even on the northern edge of yours. I guess it’s because our latitudes are so far apart north and south!

Nice write-up, Bali! And funny enough, I’ve actually used the same NEO-7M in a CubeSat project in the past, so this brought back some memories. :slightly_smiling_face:

The approach you describe is absolutely the right one for disciplining the station system clock: GNSS gives you the absolute time information, while PPS gives you a much cleaner reference for the actual second boundary, and chrony can then discipline the Linux clock around that.

One small distinction I’d add, mostly because I’ve personally bumped into it before, is that it’s useful to keep a few different concepts separate:

  • timestamp resolution

  • PPS accuracy/jitter

  • accuracy of the disciplined Linux system clock

  • accuracy of the SDR sample/frequency clock

They are related, but they are not quite the same thing.

For example, seeing nanoseconds in a PPS timestamp does not by itself mean that the station clock is accurate to nanoseconds. That number also includes the characteristics of the GNSS PPS output, GPIO/kernel timestamping, interrupt latency and the way chrony is actually disciplining the clock.

And there is another boundary that can be easy to overlook: even a beautifully disciplined Linux clock does not automatically mean that the SDR sampling clock is equally accurate, unless the SDR itself is referenced to a suitable frequency source, for example a GPSDO or another external reference.

This may sound a bit pedantic, but it starts to matter quite quickly if those timestamps are later used for scientific correlation, TDOA, Doppler analysis, or comparisons between different stations.

So I’d say your setup is a very good way to improve the station time reference; I would just avoid reading the displayed timestamp precision as the end-to-end timing accuracy of the whole RF chain.

Really nice practical tutorial.

2 Likes

Thanks for the great tutorial! Can anyone recommend a straightforward way to configure the Pi running my satnogs station so that it preferentially uses timing info from another local Pi on my home LAN? The second Pi has a GPS hat with active antenna, and is serving ntp stratum 1 data on its default port (port 123, if I’m not mistaken). Thanks for any help on this.

thank you for this great info!

install main software, chrony. this app will replace the old clock system.
sudo apt install chrony

sudo nano /etc/chrony/chrony.conf

replace

# Use Debian vendor zone.
pool 2.debian.pool.ntp.org iburst

with your lokal ntp
server 192.168.1.123 iburst

restart the chrony
sudo systemctl restart chrony

check the crony :

chronyc sources -v
chronyc tracking

you should only see your lokal ntp

1 Like

Thanks very much! I’ve got it working :slight_smile:

2 Likes