This document is an attempt on describing how to adjust a SatNOGS client properly
Structure:
- Prerequisites / dependencies
- Hardware (Pi3, RTL-SDR)
- Software (satnogs-client, gqrx)
- SatNOGS station adjustments
- Setting client to standalone mode
- Starting RTL-SDR spectrum server (rtl_tcp)
- Connecting to the spectrum server
- Adjusting ppm-error
- Adjusting gain settings
- Enhancements
- Hacking the waterfall plot script (deprecated with some next release)
- running rotator interface and rig interface via network
- Adjusting gain settings with external LNA
Prerequisites / dependencies:
Starting your journey at https://wiki.satnogs.org/ you will get a quick
overview. Assuming you read all the available “getting started” pages linked to
under “Build” and “Operate” you have already done your first observations and
you already have some waterfalls in the staging environment.
Now you come to a point you want to know, how well your station is performing.
If you did not do this already, this is the perfect time to install gqrx on your
local computer.
SatNOGS station adjustments:
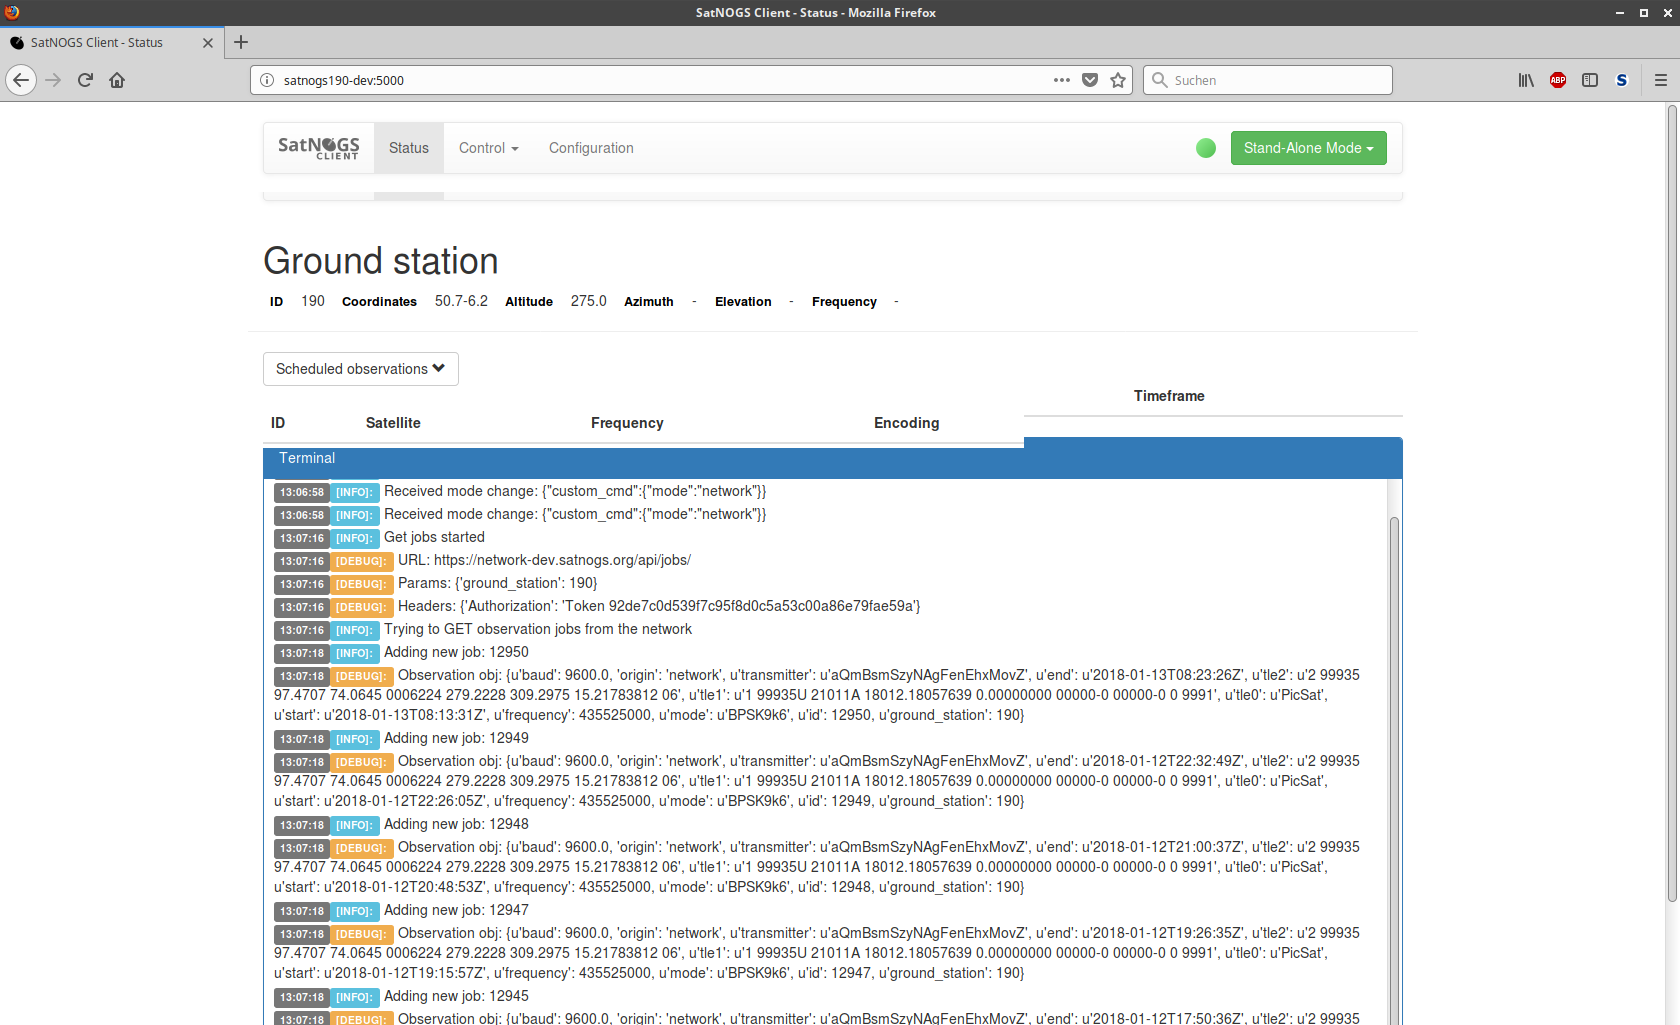
To start some kind of “adjustment” and “calibration”, please connect to your
RasPi’s local web interface. By default the URL is something like
“http://192.168.0.5:5000”.
In the upper right corner there is a big green button where you can set your
ground station in standalone mode.
Network Mode:

Standalone Mode:
Do not forget to set this back to network mode when done with your adjustments!
While your station is in standalone mode, no observations from the SatNOGS
network will be executed!
After setting to standalone, please SSH to your SatNOGS RasPi with your well
known user account.
After successful authorization you will be prompted like this:
Linux satnogs190-dev 4.9.59-v7+ #1047 SMP Sun Oct 29 12:19:23 GMT 2017 armv7l

The programs included with the Debian GNU/Linux system are free software;
the exact distribution terms for each program are described in the
individual files in /usr/share/doc/*/copyright.

Debian GNU/Linux comes with ABSOLUTELY NO WARRANTY, to the extent
permitted by applicable law.
Last login: Fri Jan 12 07:34:11 2018 from 192.168.10.35
pd@satnogs190-dev:~ $
Now go ahead and start the “RTL SDR spectrum server”:
$ rtl_tcp -a 0.0.0.0
You will get an output like this, if everything is fine:
Found 1 device(s):
  0:  Generic, RTL2832U, SN: 77771111153705700

Using device 0: Generic RTL2832U
Found Rafael Micro R820T tuner
[R82XX] PLL not locked!
Tuned to 100000000 Hz.
listening...
Use the device argument 'rtl_tcp=0.0.0.0:1234' in OsmoSDR (gr-osmosdr) source
to receive samples in GRC and control rtl_tcp parameters (frequency, gain, ...).
No further output will be generated until you connect to this server. Hitting
C-c will stop it and the command line appears. You will have to stop this server
if you want to go back to network mode - do not forget about this!
Now go ahead and start gqrx.

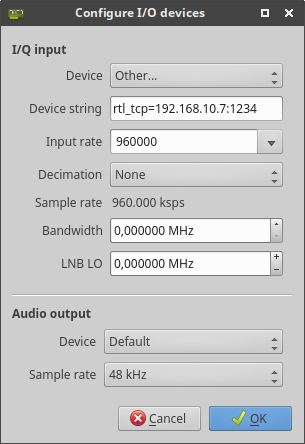
You will have to go to the setup menu, either by
clicking on the “harde” symbol, or navigating through the menu item called “File →
I/O Devices”
-
Click on “Device” and chose “RTL-SDR Spectrum Server”
-
Edit “Device string” to match your RasPi’s IP address, Port defaults to 1234,
which is the same as the default setting for your server you just started on
the RasPi -
Set “Input Rate” to something network friendly - we do not need the whole
spectrum the RTL SDR is able to convert. 1,8 MSPS (1800000) should be OK
Depending on this setting your network will get very busy. Using wireless LAN
is not recommended. Every sample has a data size of 16 bits, so the previous
setting of 1,8MSPS/s results in a network load of 28,8 MBit/s:1,8 MSPS * 16 bit/s = 28,8 MBit/s
-
“Audio Output → Device” and “-> Sample rate” should be set by default,
values on average soundcards would be something like “Default, 48 kHz” -
Close the dialogue by clicking “OK”
Your RTL-SDR spectrum server on the RasPi should now show up a connection from
your computer running gqrx.
client accepted!
set gain mode 1
set agc mode 0
set direct sampling 0
Disabled direct sampling mode
set offset tuning 0
set sample rate 960000
ll+, now 1
ll+, now 2
set freq correction 42
set freq 144500000
set gain mode 0
set agc mode 1
set gain 0
set freq 145814000
ll-, now 0
ll+, now 1
ll+, now 2
ll+, now 3
ll+, now 4
ll+, now 5
ll+, now 6
ll+, now 7
ll+, now 8
ll+, now 9
ll+, now 10
ll+, now 11
ll+, now 12
ll+, now 13
The only thing left now is to “Start DSP” - from the menu item “File”, by
hitting C-d or simply clicking the Play-Button.

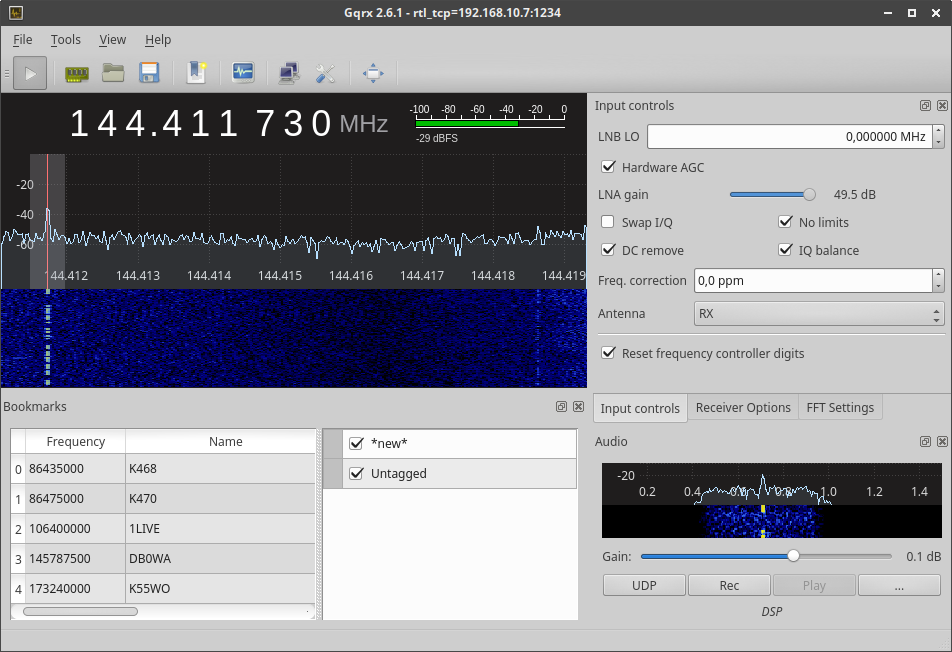
Go for a known local HAM radio repeater or a CW beacon transmitter and set your
demodulator accordingly. Narrow Band FM or CW is best to discover ppm error
offset, which is the frequency offset in parts per million (ppm) which is always
there with standard RTL-SDR dongles. It is also highly temperature dependent, so
one might have to re-evaluate this from time to time. Enter the known frequency
of your chosen transmitter (NFM repaeter or CW beacon). I have chosen a very
known CW beacon just some km away from my home: ON4VHF on 144.718000 MHz. Walk
through the tab called “Receiver options” and change the settings to fit the
beacon: “Filter width Normal”, “Filter shape Normal”, “Mode CW-L”, “AGC
Medium”. Set Squelch to something low, so you can hear noise from your
speakers. Maybe you have to Adjust the audio “Gain” to something like “0.0
dB”. You can adjust this to fit your needs to hear noise. With
ppm error, which is default, set to 0.0 ppm, one can just guess where your
receiver is listening. Anyway, just set it to 144.718000 MHz and try to find
your beacon. You can see the result for my RTL SDR dongle down here:
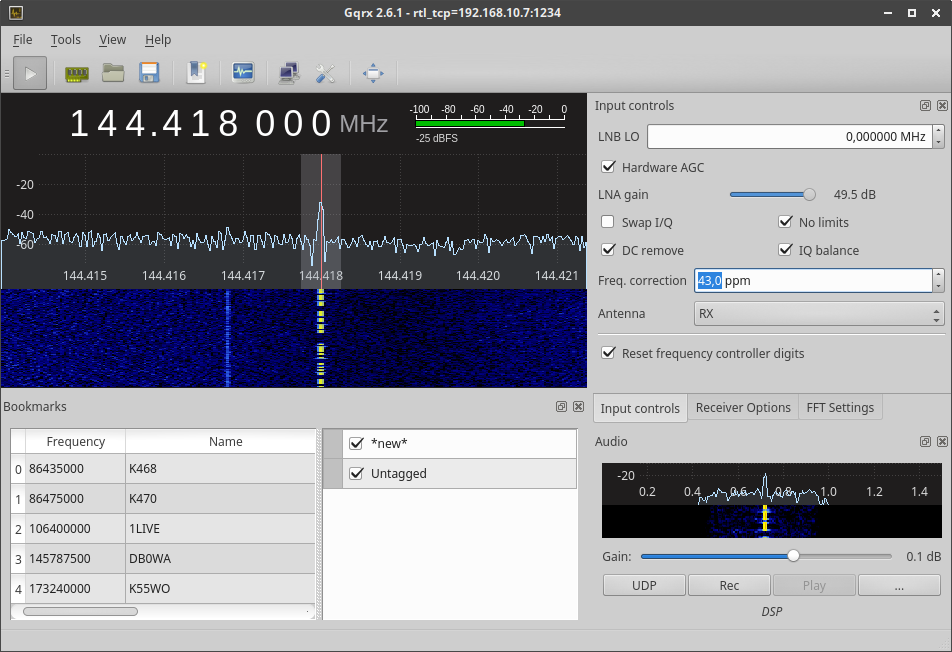
Now got to the tab called “Input controls” and find an input field called
“Freq. correction”. By default this should show “0,0 ppm”. Set frequency back to
your beacons transmit frequency. After this you have to increase the
Freq. correction value as long until you can hear the beacon. Now zoom into the
panorama by locating your mouse pointer in the range where the frequency values
are printed below the panorama, just above the waterfall. Try to fit the
Freq. correction value as good as possible, that your receivers red indication
line is just in the middle of the transmitters bandwidth.
Now write down the evaluated ppm correction value and exit gqrx as well as the
RTL SDR spectrum server. In the command line now available start satnogs-setup:
$ sudo satnogs-setup
Navigate to “Advanced → SATNOGS_PPM_ERROR” and enter the new value.

Exit the satnogs-setup with “Back”, then “Apply Configuration” (this might take
a while) and “Back”.
You are done with frequency offset correction.
You get a nice tool to do some SDR stuff by the way. Just play around a bit and get familiar with all that stuff. Just keep in mind that, as long as you run the RTL SDR Spectrum server or you have set your client into standalone mode, nothing is done from network.
Enhancements:
Waterfall color improvements:
To get some nicer waterfalls one has to dig into waterfall plotting script. This is a static one and, so far, cannot be configured through satnogs-setup. Anyway: there is no magic behind it and one can understand what the changes are once you have seen them.
Log into the RasPi and start at making a copy of /usr/share/satnogs/scripts/satnogs_waterfall.gp, just in case:
$ cp /usr/share/satnogs/scripts/satnogs_waterfall.gp ~/.
Now you can start editing the script:
$ sudo nano /usr/share/satnogs/scripts/satnogs_waterfall.gp
Search for a line starting with cbtics:
# Spectravue palette and scale
set cbtics (-110, -105, -100, -95, -90, -85, -80, -75, -70, -65, -60, -55, -50, -55, -40)
Comment it out by adding a #, copy, paste and edit that new line that it matches something like this:
# Spectravue palette and scale
#set cbtics (-110, -105, -100, -95, -90, -85, -80, -75, -70, -65, -60, -55, -50, -55, -40)
set cbtics (-90, -85, -80, -75, -70, -65, -60, -55, -50, -55, -45, -40, -35, -40, -25)
Now go ahead and find a line with cbrange:
set ylabel 'Time (seconds)'
set cbrange [-100:-50]
I guess, one already gets the point - change cbrange to match the new cbtics:
set ylabel 'Time (seconds)'
#set cbrange [-100:-50]
set cbrange [-85:-35]
Save the file and you are done. Schedule some observations and watch the new colors. Maybe you can just improve it a little more but keep in mind: always keep a bit of the noise floor into the waterfalls, so you can see the whole signals dynamic range. I love it, when there are only a few dots of the noise.
[to be continued…]
P.S.: Comments and discussion welcome!
 ).
).